Start here
Choose the right eye finish before you close the head
Amigurumi safety eyes are two-part plastic fasteners consisting of a domed eye piece with a ridged post on the back and a flat washer that locks onto the post, creating a secure attachment that will not pull out of your crochet fabric under normal use. I still remember the first time I used safety eyes. I was making a little bear for my daughter, and I had been embroidering eyes on everything because I was intimidated by the little plastic parts. Then a friend showed me how simple the installation actually is, and I have never looked back. Safety eyes give amigurumi a polished, professional look that embroidery alone cannot quite match, and they are surprisingly easy to use once you understand the process.
Safety eyes come in a range of sizes, colors, and styles. The most common type is the classic round black eye with a colored iris, but you can also find oval eyes (great for cats and reptiles), glitter eyes, and even glow-in-the-dark eyes. For most beginner amigurumi projects, a set of 8mm and 10mm round black eyes will cover nearly everything you want to make. If you are following along with my amigurumi guide or my easy amigurumi cat pattern, this article will answer every question you have about making the face look right.
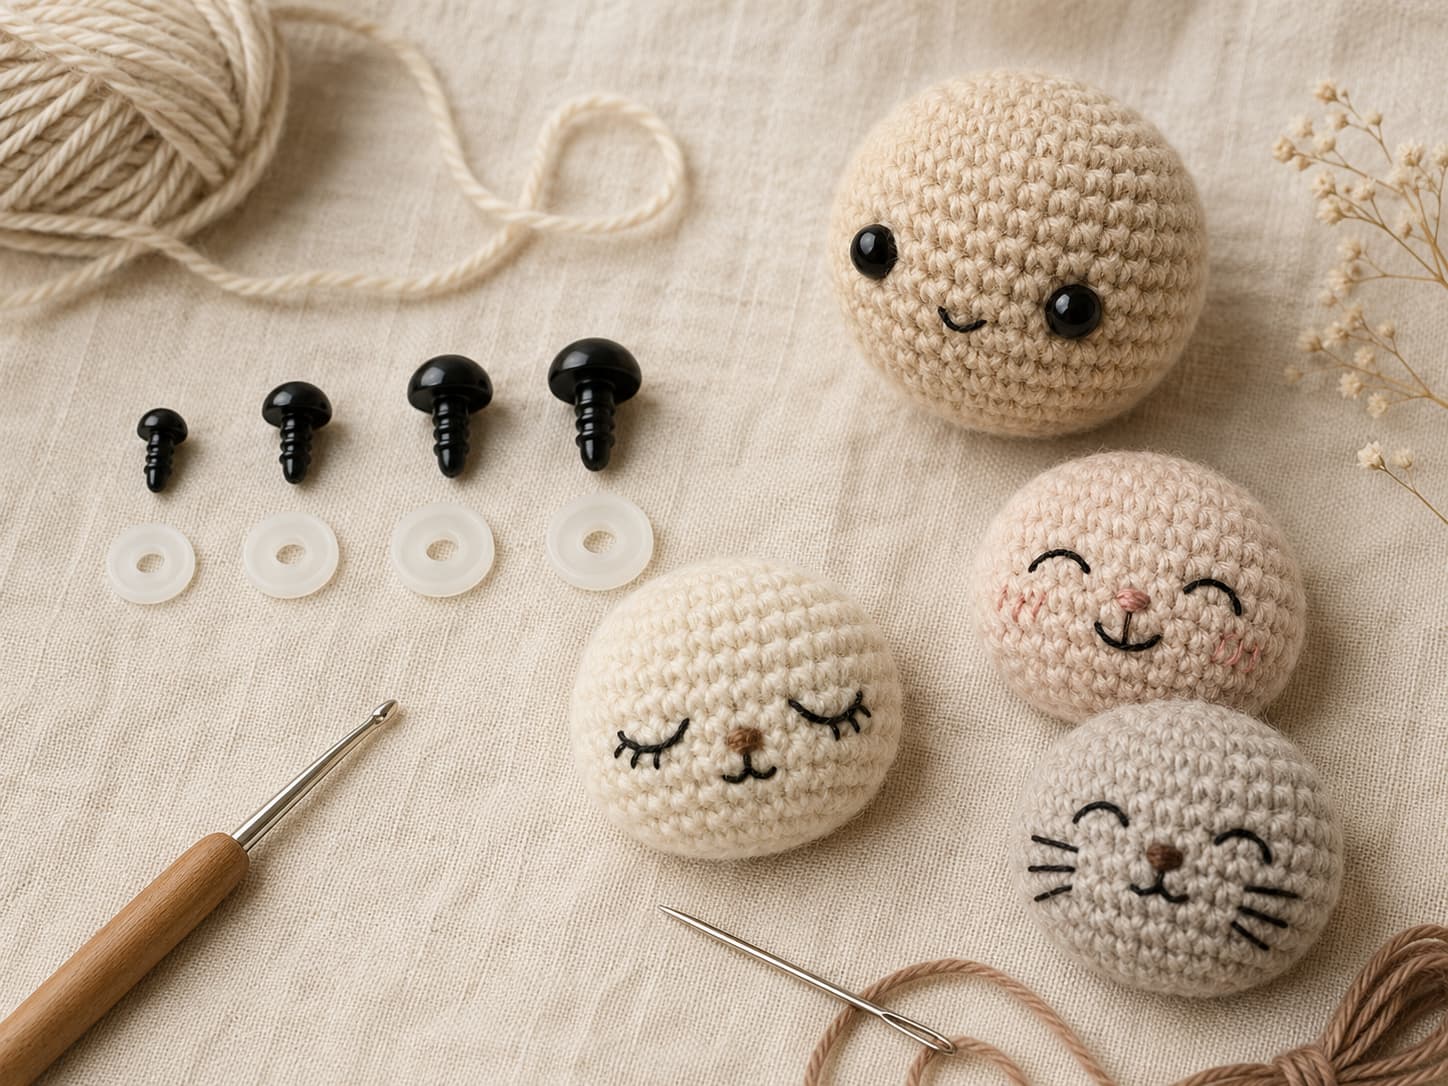
Installation, sizing, placement, and four face-finishing techniques.
Designed for crocheters finishing their first amigurumi faces.
Covers four common safety-eye sizes used in small and medium projects.
French knots, satin stitch, crochet patches, and securely sewn felt alternatives.
The washer must be attached while you can still reach the inside of the piece.
Count stitches, compare both sides, and check the face in a photo first.
In this article
Safety Eye Sizes: A Complete Guide
Safety eye sizes are measured in millimeters and refer to the diameter of the eye dome. The size you choose makes a dramatic difference to your amigurumi's expression. An eye that is too large looks startled; an eye that is too small looks beady and unfriendly. Here is a complete guide to the four most common sizes and when to use each one.
| Size | Diameter | Post Length | Best For | Example Projects |
|---|---|---|---|---|
| 6mm | 0.24 inches | ~6mm | Very small amigurumi (under 3 inches tall), tiny details, secondary eyes | Keychain animals, mini ornaments, bees, ladybugs |
| 8mm | 0.31 inches | ~8mm | Small amigurumi (3–5 inches tall), the most versatile size | Cats, bears, bunnies, most beginner projects |
| 10mm | 0.39 inches | ~9mm | Medium amigurumi (5–8 inches tall), expressive faces | Larger cats, dogs, dolls, fantasy creatures |
| 12mm | 0.47 inches | ~10mm | Large amigurumi (8+ inches tall), statement eyes | Jumbo animals, decorative pillows, oversized plushies |
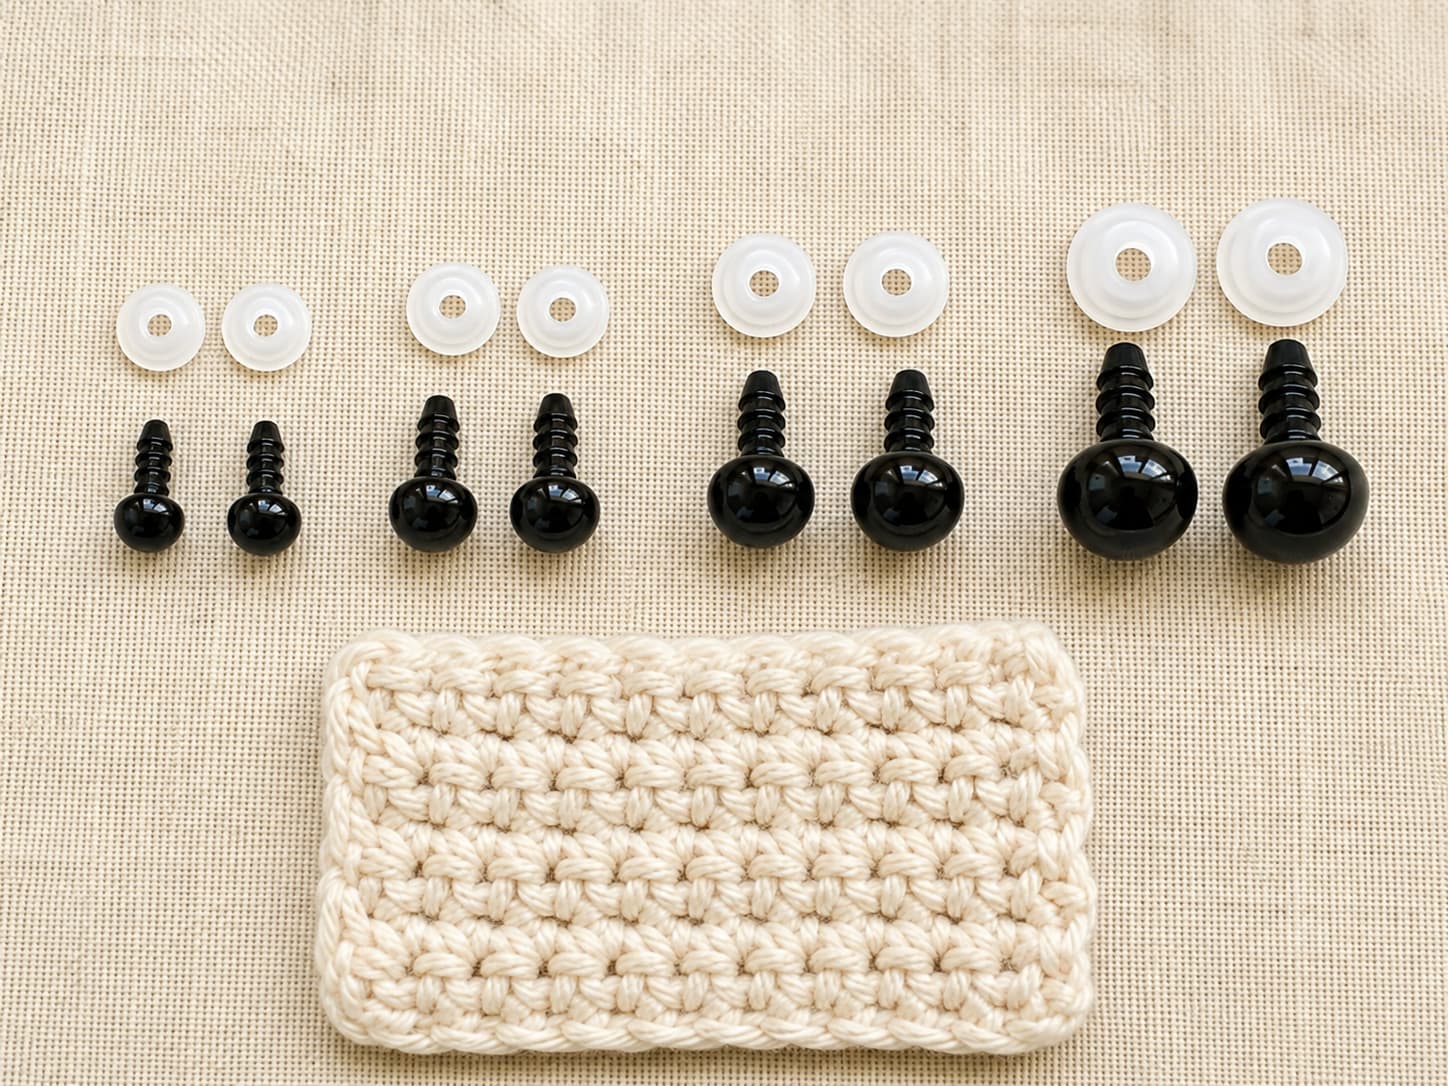
For the easy amigurumi cat pattern, I recommend 8mm or 10mm eyes. The 8mm gives a sweet, slightly shy expression; the 10mm gives a more alert, curious look. I keep a small multi-pack of 6mm through 12mm safety eyes in my crochet kit at all times. They cost about $8 for a pack of 100 assorted eyes, and that single pack has lasted me through three years of amigurumi projects.
How to Install Safety Eyes
Installing safety eyes is straightforward, but the order of operations matters. Here is the step-by-step process I use every time.
Step-by-Step Installation
- Choose your eye position. Before you close the amigurumi body, use pins to mark exactly where you want each eye. Count your stitches and rows to make sure the eyes are symmetrical. For a sphere worked from the bottom up, eyes typically go between Rounds 10 and 12, about 6–8 stitches apart.
- Push the post through. Insert the metal or plastic post of the safety eye through the gap between two stitches at your marked position. Push from the outside of the amigurumi inward. The dome of the eye should sit on the outside of the fabric. If the post does not go through easily, use your hook to gently stretch the stitch gap — do not force it so hard that you break the yarn.
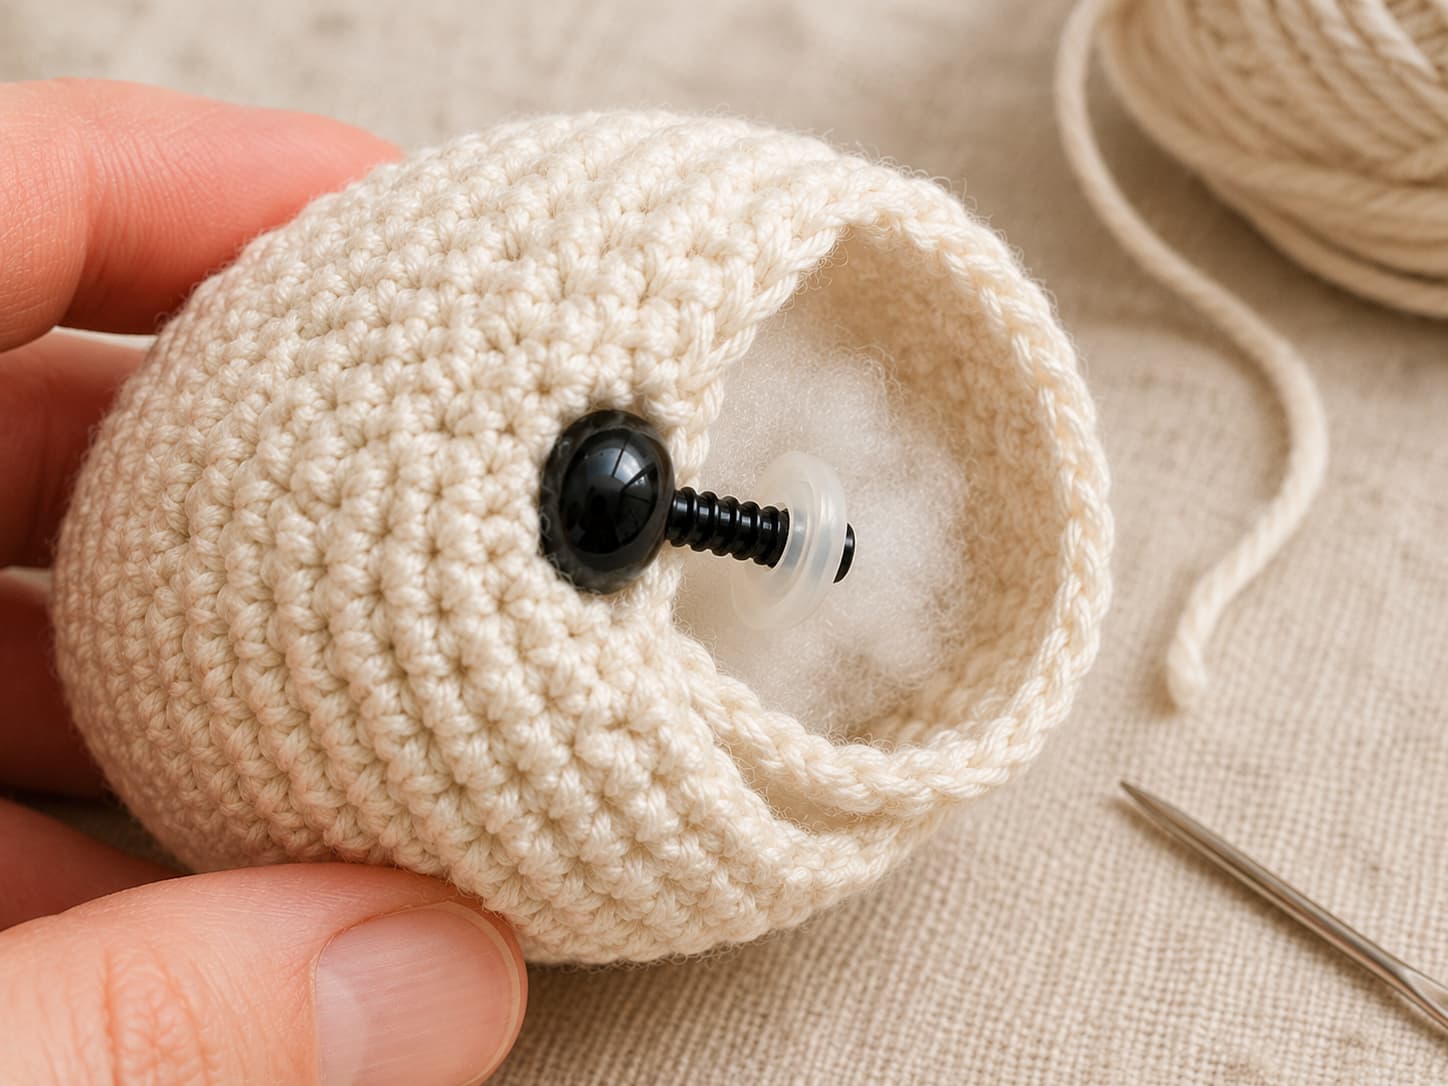
- Attach the washer from the inside. Reach inside the amigurumi body (this is why you install eyes before closing). Slide the washer over the post, with the ridged side facing the fabric. The ridges grip the post and prevent it from sliding off.
- Press firmly until it clicks. Push the washer down the post as far as it will go. You should feel or hear a click when the washer locks into place. The washer should sit flush against the inside of the fabric with no gap between the washer and the yarn.
- Test the attachment. Gently tug on the eye from the outside. It should not move. If it wiggles, the washer is not fully seated. Push harder. If the post is too long for your fabric thickness, you can add a small circle of felt behind the washer as a spacer.
- Repeat for the second eye. Install the second eye at the marked position. Check from the front that both eyes are level and symmetrical before you continue crocheting.
Placement Guide: Where to Put Eyes on Different Animal Shapes
Eye placement is the single most important factor in how your amigurumi's face reads. A shift of just one stitch can change the expression from sweet to unsettling. Here are my placement guidelines for the most common amigurumi shapes.
| Animal Shape | Eye Position | Spacing | Expression Notes |
|---|---|---|---|
| Round (bear, cat, bunny) | Between Rounds 10–12 | 6–8 sts apart | Eyes at the midline or slightly above create a cute, friendly look. Eyes too high look surprised; eyes too low look sad. |
| Oval (dog, fox) | Between Rounds 8–10 | 8–10 sts apart | Slightly wider spacing gives a more canine, friendly expression. Pair with a longer snout. |
| Flat (owl, bird) | Center of the face disc | 4–6 sts apart | Eyes closer together look more focused and intense. Great for owls and birds of prey. |
| Tall (giraffe, llama) | Upper third of the head | 6–8 sts apart | Eyes higher on the head with a longer face below read as elegant and graceful. |
| Tiny (bee, ladybug) | Between Rounds 6–8 | 4–5 sts apart | Use 6mm eyes. Slightly closer spacing on tiny faces reads as cute rather than crowded. |
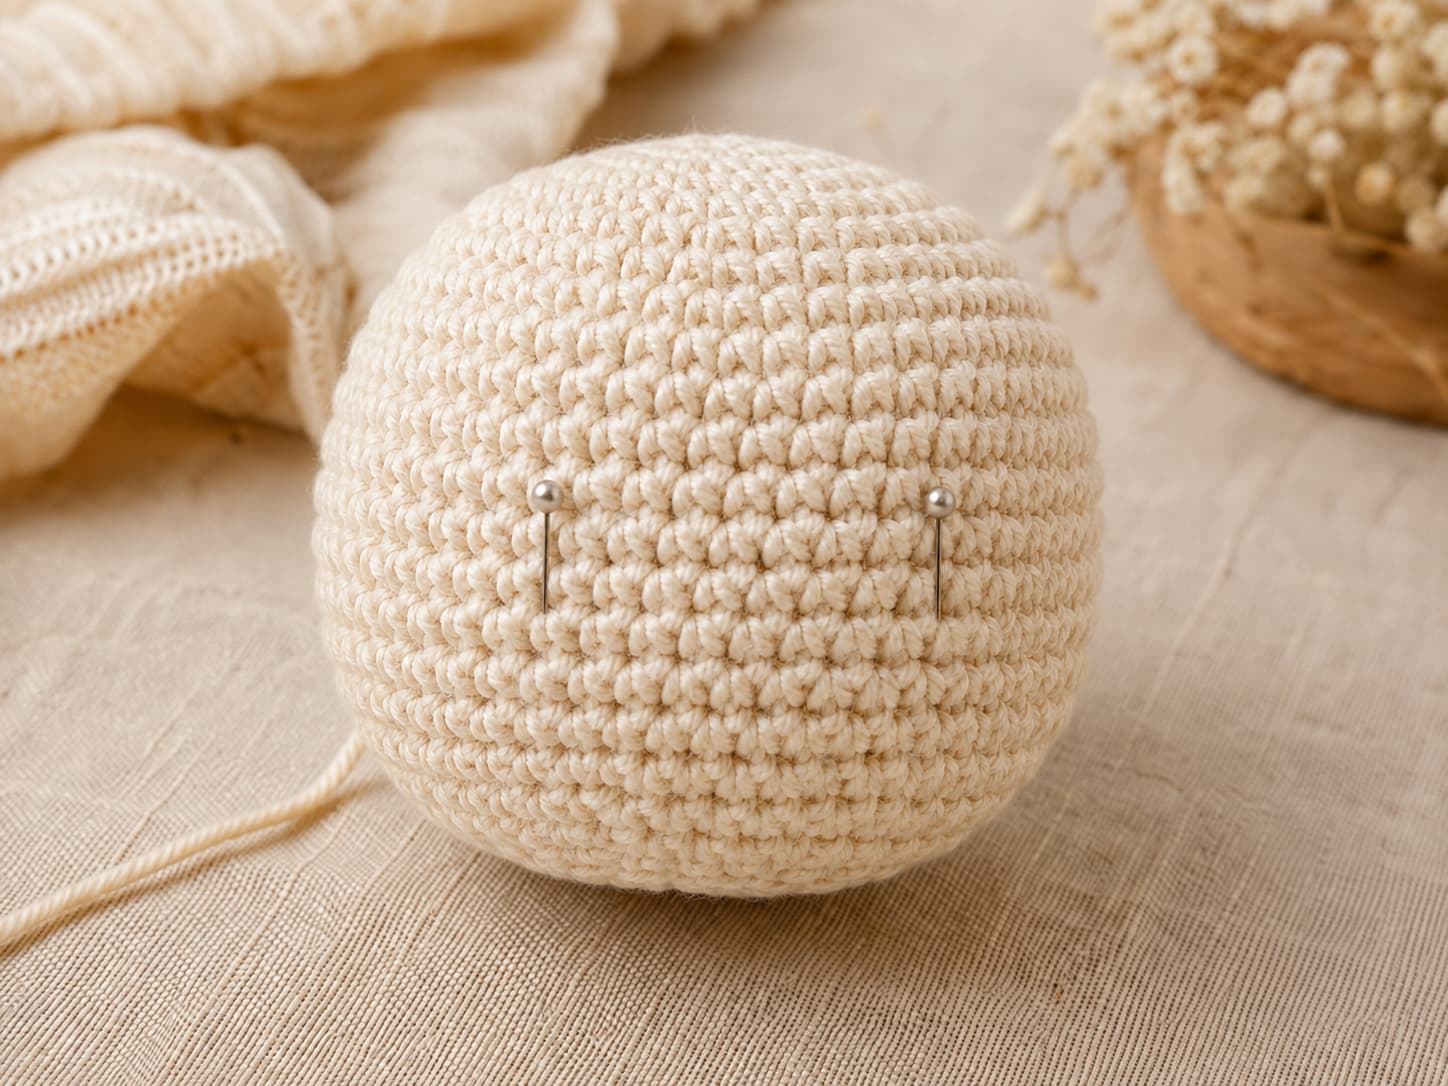
The golden rule of eye placement: always pin before you install. Take a photo of the pinned face with your phone and look at it. Photos reveal asymmetry that your eyes might miss when you are staring at the project up close. I have caught crooked eyes this way more times than I can count.
When to Install: The Crucial Timing Tip
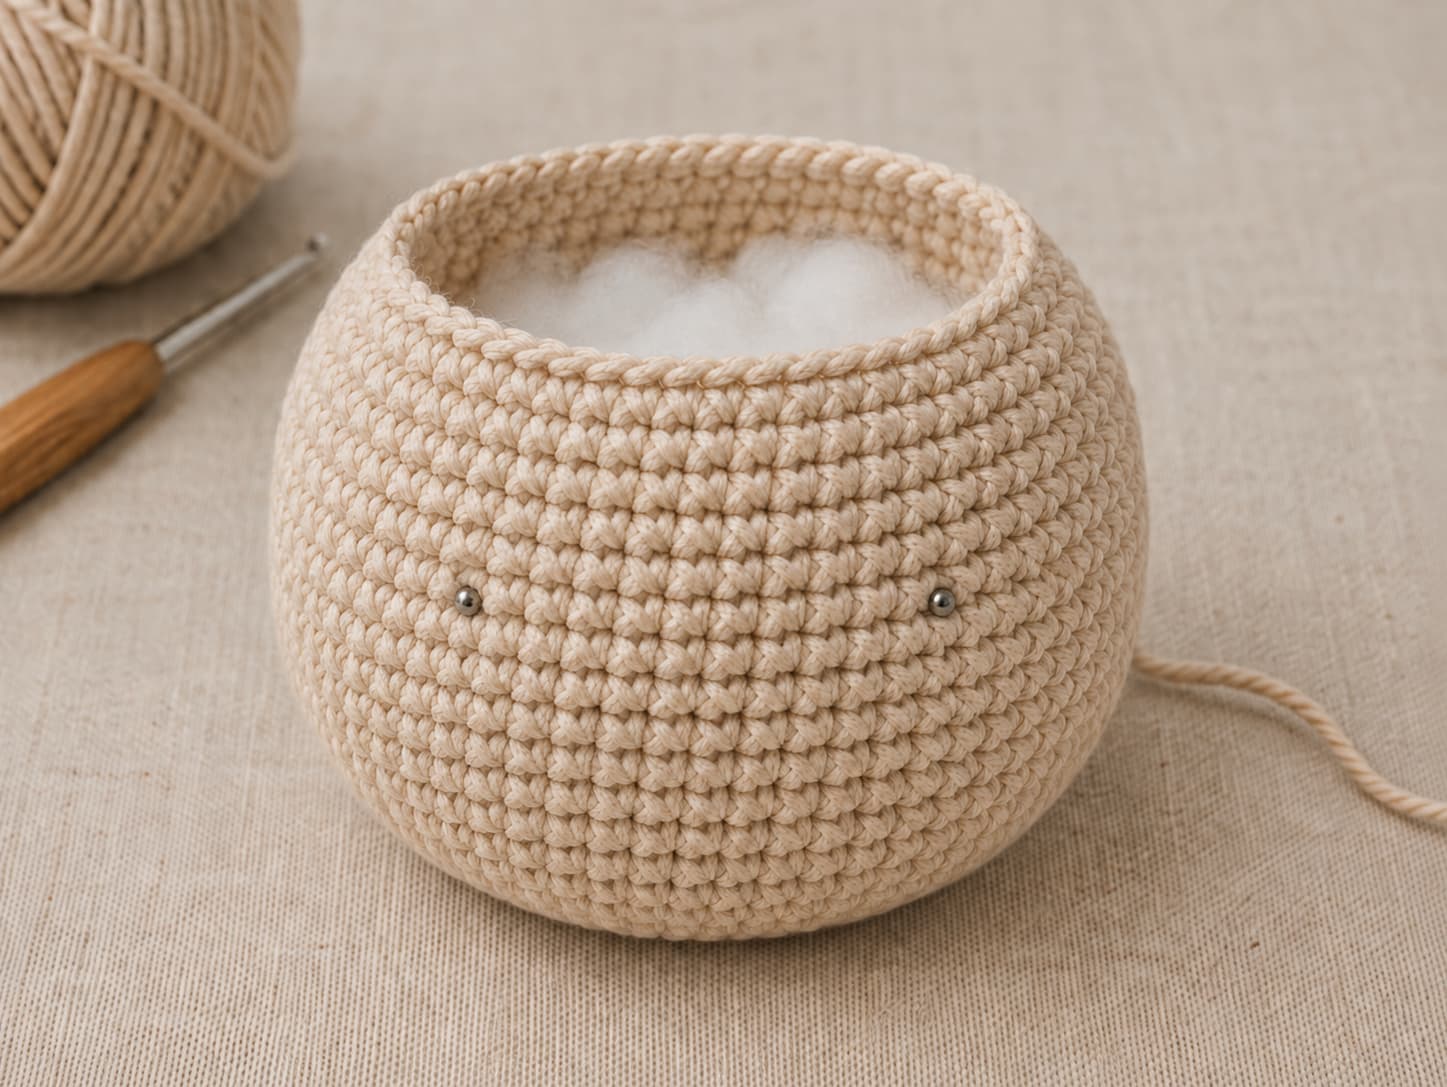
This is the mistake I see beginners make more than any other, and it is heartbreaking because it is so easy to avoid: you must install safety eyes before you close the amigurumi body.
For a typical sphere amigurumi, install the eyes between Rounds 12 and 14, when the body is still wide open and you can easily reach inside. The last round of increases should be complete, and you should have several rounds of even single crochet before the decreases begin. This gives you a stable, flat section of fabric to work with and plenty of room to reach inside and attach the washers.
If you forget and close the body before installing the eyes, your options are unpleasant: you can try to work through the small opening at the bottom (extremely difficult), you can undo several rounds of decreases (frustrating), or you can embroider the eyes instead (a different look, but sometimes the best option). I have done all three at various points, and I now have a sticky note on my crochet lamp that says "EYES BEFORE CLOSING" in large letters.
Face Embroidery: 4 Techniques
Whether you are using safety eyes or embroidering the entire face, the embroidery details around the eyes and nose make a huge difference. Here are the four techniques I use most often.
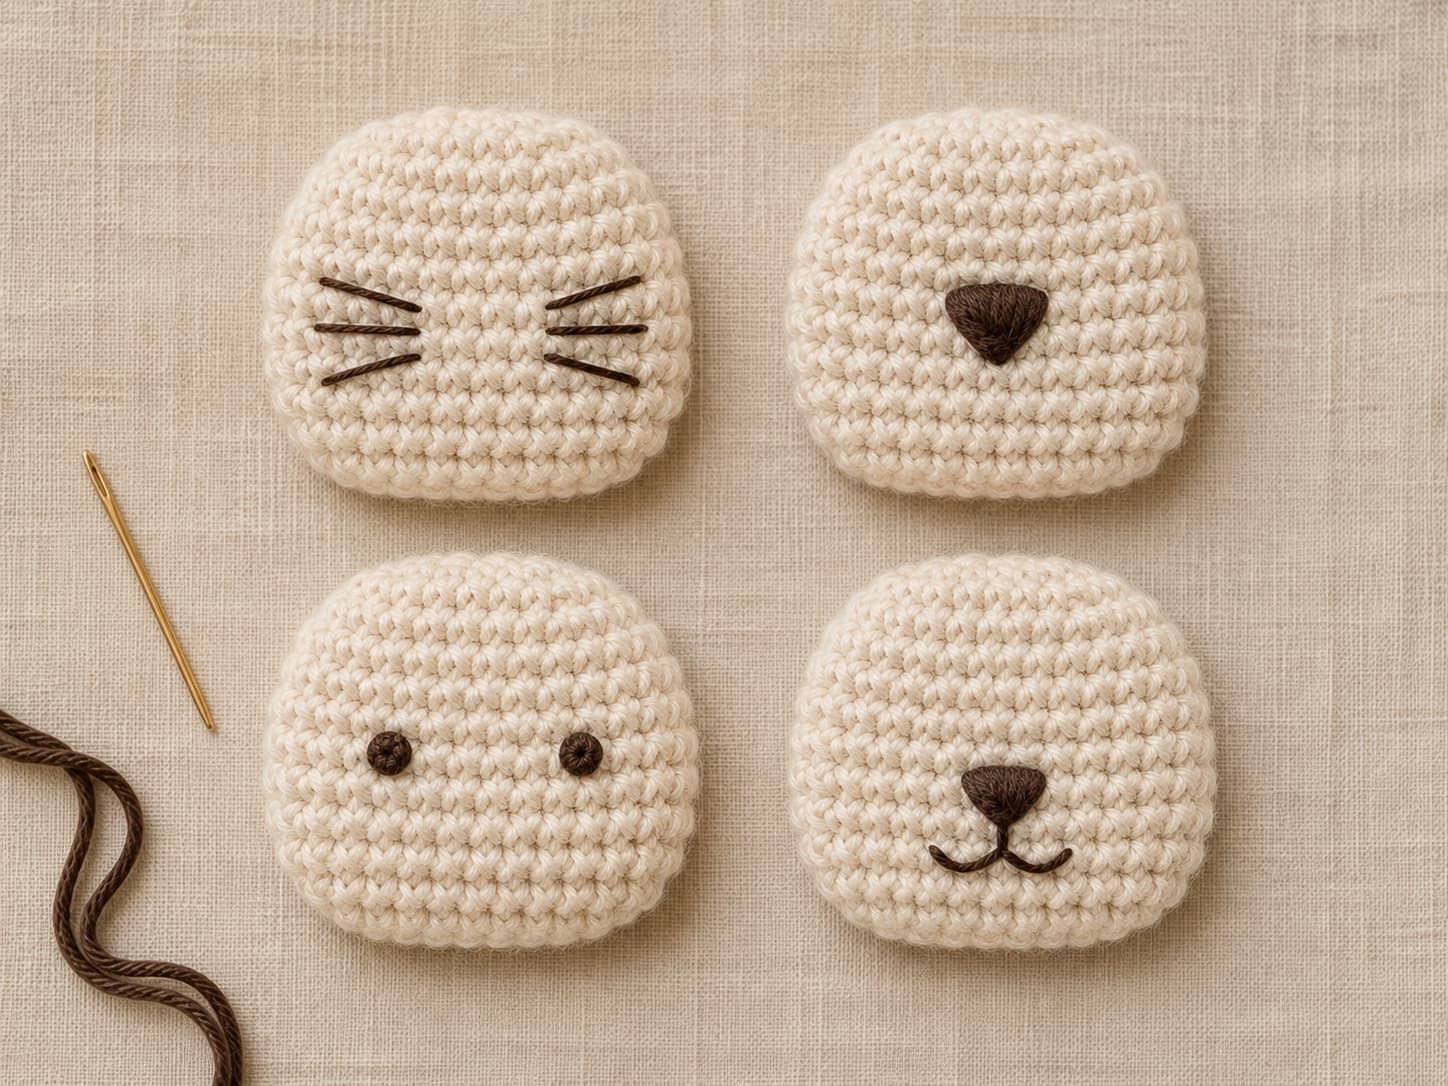
1. Straight Stitch for Whiskers
How to Work Straight Stitch Whiskers
- Thread a yarn needle with a single strand of black embroidery thread or a split 2-ply strand of black yarn.
- Insert the needle from the inside of the head (or from an inconspicuous entry point) and exit at the whisker starting point, next to the nose.
- Make a straight stitch outward, about 1 inch long. Insert the needle back into the fabric at the whisker end point.
- Repeat for 3 whiskers on each side of the nose, fanning them outward at slightly different angles.
- Weave the thread end inside the head so the whiskers are secure.
Straight stitch whiskers give a classic cat or bunny look. I use this technique on every amigurumi cat I make. The key is to keep the tension even — if the stitches are too tight, the whiskers will pull the fabric and create dimples. If they are too loose, the whiskers will sag.
2. Satin Stitch for Nose
How to Work a Satin Stitch Nose
- Mark the nose shape with pins: a small triangle about 0.3 inches wide and 0.25 inches tall, or a horizontal oval for a different look.
- Thread a yarn needle with pink or brown embroidery thread.
- Bring the needle up at one edge of the nose shape. Take it down at the opposite edge.
- Continue making parallel stitches side by side, covering the entire nose shape. Keep the stitches touching each other with no gaps.
- For a 3D effect, build up the center of the nose with an extra layer of stitches.
Satin stitch gives a smooth, solid fill that looks polished and professional. I use it for noses on nearly every amigurumi animal I make. The triangle shape reads as a cat or bear nose; the horizontal oval reads as a dog nose. Choose pink for a cute, cartoonish look or dark brown for a more realistic one.
3. French Knot for Eyes
How to Work a French Knot Eye
- Thread a yarn needle with black embroidery thread. Bring the needle up at the eye position.
- Hold the thread taut with your non-dominant hand, about 2 inches from the fabric.
- Wrap the thread around the needle 2–3 times (2 wraps for a small knot, 3 for a larger one). Keep the wraps close to the fabric surface.
- While holding the wrapped thread in place with your thumb, insert the needle back into the fabric very close to (but not exactly in) the same hole it came out of.
- Pull the needle and thread through gently. The wraps will form a neat knot on the surface.
French knots are my go-to for embroidered eyes on baby-safe amigurumi. They create a small, raised dot that looks remarkably like a safety eye but is completely secure and cannot be pulled off. A double French knot (two knots side by side) with a tiny white highlight stitch next to each one gives the most realistic eye look without any plastic parts.
4. Backstitch for Mouth
How to Work a Backstitch Mouth
- Thread a yarn needle with black embroidery thread. Mark the mouth line with a pin: a vertical line from the bottom of the nose down about 0.4 inches, then splitting into two angled lines (an inverted Y shape).
- Bring the needle up at the start of the mouth line (the bottom of the nose).
- Take a stitch forward about 0.15 inches, insert the needle, and bring it up again one stitch-length ahead.
- Insert the needle back at the end of the previous stitch. This creates a continuous line with no gaps.
- Continue along the inverted Y shape. For the split, work one side of the Y first, then come back and work the other side.
Backstitch gives a clean, continuous line that is perfect for mouths and other linear details. The inverted Y mouth is the classic amigurumi smile shape, and it works on everything from cats to bears to bunnies. For a simpler look, you can skip the Y split and just do a straight vertical line for a more neutral expression.
Baby-Safe Alternatives to Safety Eyes
Safety eyes are called "safety" eyes, but they are not safe for children under 3 years old. Despite the washer locking mechanism, safety eyes can be pulled out with enough force, and a detached safety eye is a serious choking hazard. For babies, toddlers, and any amigurumi that might end up in a small child's hands, embroidered features are the only safe option.
| Alternative | Safety Level | Appearance | Best For |
|---|---|---|---|
| French Knot Eyes | Fully baby-safe | Small raised dots, similar to safety eyes | All baby-safe amigurumi, especially small animals |
| Satin Stitch Eyes | Fully baby-safe | Flat oval shapes, can be made in any color | Larger amigurumi, sleepy/closed eyes |
| Crochet Eye Patches | Fully baby-safe | Small crocheted circles sewn onto the face | Cartoon-style amigurumi, white eye patches with black pupil circles |
| Felt Eyes (sewn on) | Safe if securely sewn | Flat, precise shapes | Custom shapes, colorful eyes; must be sewn with at least 12 stitches around the perimeter |
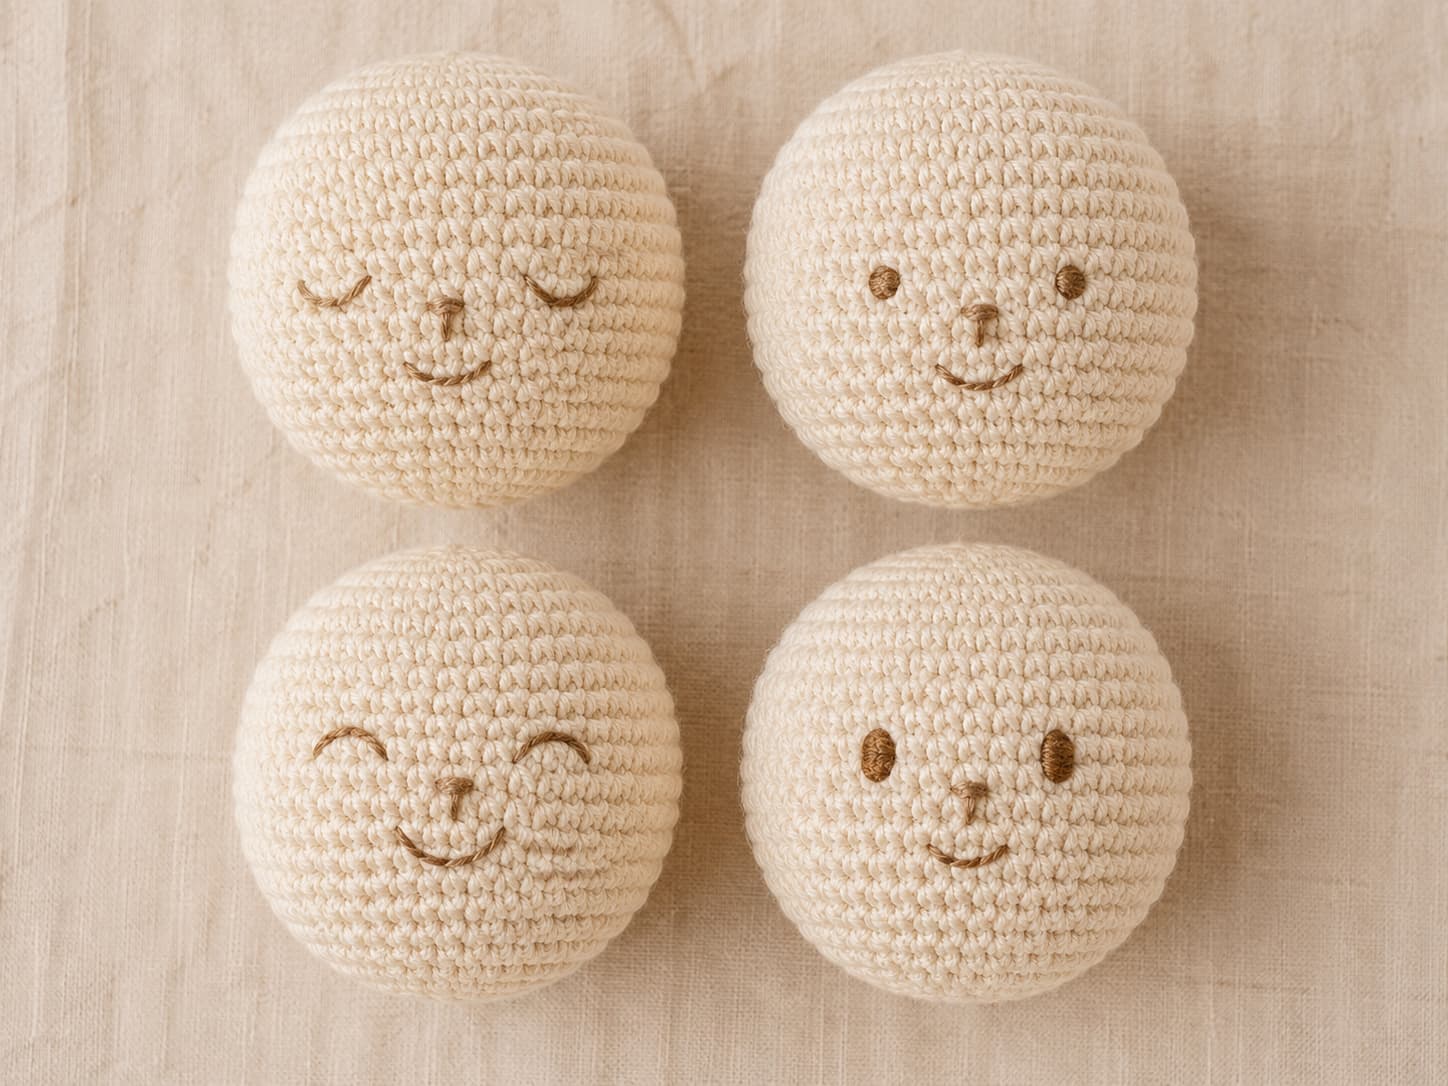
For the absolute safest option, embroider everything. A French knot eye with a satin stitch nose and backstitch mouth, all worked in embroidery thread, creates a face that is completely integrated into the fabric. Nothing can come loose because there is nothing separate to detach. This is what I use for every amigurumi I make for babies and toddlers.
Product Recommendations
Here are the safety eyes and embroidery supplies I use and recommend. As an affiliate partner, I may earn a small commission on qualifying purchases at no extra cost to you. See my full disclosure.
| Product | Price | Includes | Why I Recommend It |
|---|---|---|---|
| Assorted Safety Eyes (100-pack) | $7–$9 | 6mm, 8mm, 10mm, 12mm in black, with washers | The best value starter pack. Covers every project size you will encounter as a beginner. |
| Colored Safety Eyes (60-pack) | $10–$12 | 8mm and 10mm in blue, green, brown, and gray | For when you want eye color variety. The blue eyes are especially lovely on fantasy creatures. |
| DMC Embroidery Floss (Black) | $1–$2 per skein | 8.7 yards, 6-strand cotton | The gold standard for face embroidery. Split to 2 strands for fine detail work. |
| Clover Tapestry Needles (Set of 3) | $5–$7 | Bent-tip and straight, sizes 13–17 | The bent-tip needle is a game-changer for embroidering faces on stuffed amigurumi. Much easier to maneuver. |
| Amigurumi Starter Kit | $20–$30 | Yarn, hook, safety eyes, stuffing, stitch markers, needles | All-in-one kit if you want to buy everything at once. Makes a great gift, too. |
6 Common Mistakes with Safety Eyes and Face Embroidery
- Installing eyes after closing the body. This is the mistake I see most often, and I have made it myself. You cannot properly attach the washer backing if the body is already closed. Always install safety eyes before the final decrease rounds when the opening is still wide enough to fit your hand inside. I now put a sticky note on my pattern that says "STOP: INSTALL EYES" right before the decrease section.
- Not checking symmetry before locking the washer. Once the washer clicks on, it is nearly impossible to remove without destroying it. Before you push the washer down, check the eye position from every angle. Are the eyes level? Are they the same distance from the center? Are they the same distance from the top of the head? Use pins, count stitches, and take a photo before committing.
- Using eyes that are too large or too small for the project. An 8mm eye on a 3-inch amigurumi looks startled and alien-like. A 6mm eye on a 10-inch amigurumi disappears into the face. The general rule: eye diameter should be roughly 1/12 to 1/10 of the finished amigurumi's height. For a 5-inch cat, that means 8mm or 10mm eyes.
- Pulling embroidery stitches too tight. Tight embroidery stitches create dimples and puckers in the fabric. The thread should lie flat against the surface without pulling the yarn inward. If you see the fabric indenting around your stitches, loosen your tension. It is easier to tighten a loose stitch by gently tugging from the back than to fix a too-tight stitch.
- Using too many strands of embroidery thread. Six strands of embroidery floss is far too thick for amigurumi faces. It looks bulky and makes it hard to work neat stitches. Split the floss to 2 strands for fine details like whiskers and mouths, and 3–4 strands for eyes and noses. The difference in finish quality is immediately noticeable.
- Not securing embroidery thread ends inside the amigurumi. Embroidered features that are not properly secured will loosen over time, especially if the amigurumi is played with. After completing each embroidered feature, weave the thread end through the stuffing inside the head in at least 3 different directions before trimming. The stuffing provides friction that holds the thread in place.
5 Pro Tips for Professional-Looking Faces
- Use a bent-tip tapestry needle for face embroidery. A straight needle is hard to maneuver when you are working on a stuffed, rounded surface. A bent-tip needle lets you enter and exit the fabric at better angles, making it much easier to place stitches exactly where you want them. I resisted buying one for years, and when I finally did, I was annoyed at myself for waiting so long.
- Add a tiny white highlight to each eye. Whether you are using safety eyes or embroidered eyes, a single white straight stitch (or a dot of white embroidery thread) placed at the upper-right of each eye creates a light reflection that makes the eyes look alive. This tiny detail takes 30 seconds per eye and transforms the face from flat to expressive. I use white embroidery thread and a single 0.2-inch stitch.
- Sketch the face on paper before you stitch. I keep a small sketchbook where I draw the face I want before I embroider it. I draw a circle the size of my amigurumi's face, sketch the eyes, nose, and mouth, and use that as a reference while I work. It sounds like overkill, but it prevents the "I will just figure it out as I go" approach that leads to crooked faces.
- Use a water-soluble fabric marker to draw the face directly on the amigurumi. Before you embroider, lightly sketch the eye positions, nose, and mouth directly on the crochet fabric with a water-soluble fabric marker. The marks rinse out with a damp cloth after you finish embroidering. This is the single best trick I know for getting symmetrical faces. Test the marker on a scrap of yarn first to make sure it washes out.
- Keep a reference photo of a face you like. Find a photo of an amigurumi face that you love (Pinterest is full of them) and keep it next to you while you work. Pay attention to the eye spacing, the nose shape, the mouth style. It is not about copying the exact design; it is about understanding the proportions that make a face read as cute. I have a folder on my phone called "Amigurumi Faces" that I reference constantly.
Next steps
Frequently asked questions
1.Can I remove a safety eye after I have installed it?
It is extremely difficult. The washer is designed to lock permanently onto the post. To remove it, you typically need to cut the washer off with wire cutters or small pliers, which destroys the washer. The eye itself can be reused if you buy replacement washers. Your best strategy is to get the placement right before you lock the washer. Pin, check, photograph, double-check, and only then push the washer down.
2.Which safety eye size should I use for the easy amigurumi cat pattern?
For the easy amigurumi cat (about 5 inches tall), I recommend 8mm or 10mm safety eyes. 8mm gives a sweet, slightly shy expression; 10mm gives a more alert, curious look. Both look great. If you are unsure, 8mm is the safer choice — it is easier to make small eyes look intentional than to make large eyes look proportionate.
3.Are safety eyes actually safe for children?
No. Despite the name, safety eyes are not safe for children under 3 years old. With enough force, the washer can be pulled through the crochet fabric, and the detached eye is a choking hazard. For children under 3, always use embroidered features. For children ages 3–6, safety eyes are generally acceptable, but I recommend reinforcing the fabric behind the eye with a small circle of felt to make it even harder to pull through. For children over 6, standard safety eyes are fine.
4.What if my safety eye post is too long for my fabric thickness?
If the post protrudes past the washer and there is a gap between the washer and the fabric, the eye will be loose and wobbly. The fix is simple: cut a small circle of felt (about 0.5 inches in diameter), poke a hole in the center, and slide it onto the post between the fabric and the washer. The felt acts as a spacer and fills the gap. I keep a sheet of craft felt and a hole punch in my amigurumi kit for exactly this purpose.
5.How do I fix a crooked embroidered face?
If the embroidery thread has not been woven in yet, you can simply pull out the stitches and redo them. If the ends are already woven in, you can carefully snip the stitches on the surface with small scissors and pull out the thread with tweezers. For permanent fixes on dark yarn where the old stitch holes are visible, you can embroider a slightly larger feature over the old one to cover the holes. Prevention is better than cure: always sketch the face with a water-soluble marker before stitching.
6.Can I mix safety eyes with embroidered features on the same amigurumi?
Absolutely, and I do this all the time. My preferred combination is safety eyes with an embroidered nose and mouth. The safety eyes give the professional, polished look, while the embroidered details give you complete control over the expression. Just remember: if the amigurumi is for a child under 3, safety eyes are not safe even if everything else is embroidered. Go all-embroidery for baby-safe projects.
Final thoughts
Clean amigurumi faces come from deliberate placement and careful finishing. Test eye spacing before locking washers, install safety eyes while the body is still open, and use embroidery when you need a fully integrated baby-safe face.
Get the Free Amigurumi Face Design Template PDF
A printable template with eye-placement guides, nose shapes, mouth styles, and a face-planning worksheet.