Skip to the guide

Essential pattern skills

How to Read Crochet Patterns: A Beginner's Guide

Learn to read crochet patterns with confidence — abbreviations, stitch counts, repeats, gauge, skill levels, and chart symbols all explained in plain English, using real examples from Knitsoul's own patterns.

Skill-building Crochet Reference guide All skill levels

Start here

Crochet patterns are not written in a secret language

Reading a crochet pattern means translating standardized abbreviations, repeat markers, stitch counts, and construction notes into a sequence of crochet actions. A line such as ch 3, *dc in next st, ch 1, skip 1 st; repeat from * across (24 dc) may look compact, but each part has one specific job: begin the row, identify the repeated sequence, show where each stitch goes, and confirm the final count.

Crochet patterns are compact rather than cryptic. Abbreviations keep a pattern readable, repeat markers prevent the same sequence from being written dozens of times, and the number at the end of a row gives you a built-in accuracy check. Once the common conventions become familiar, a written pattern works much like a carefully structured recipe.

This article is your translator. I will walk you through every piece of a crochet pattern — abbreviations, repeats, stitch counts, gauge, skill levels, and even those little symbol charts — using the real pattern from Knitsoul's easy crochet dishcloth as our example. By the end, you will be able to pick up any beginner pattern and know exactly what it is asking you to do.

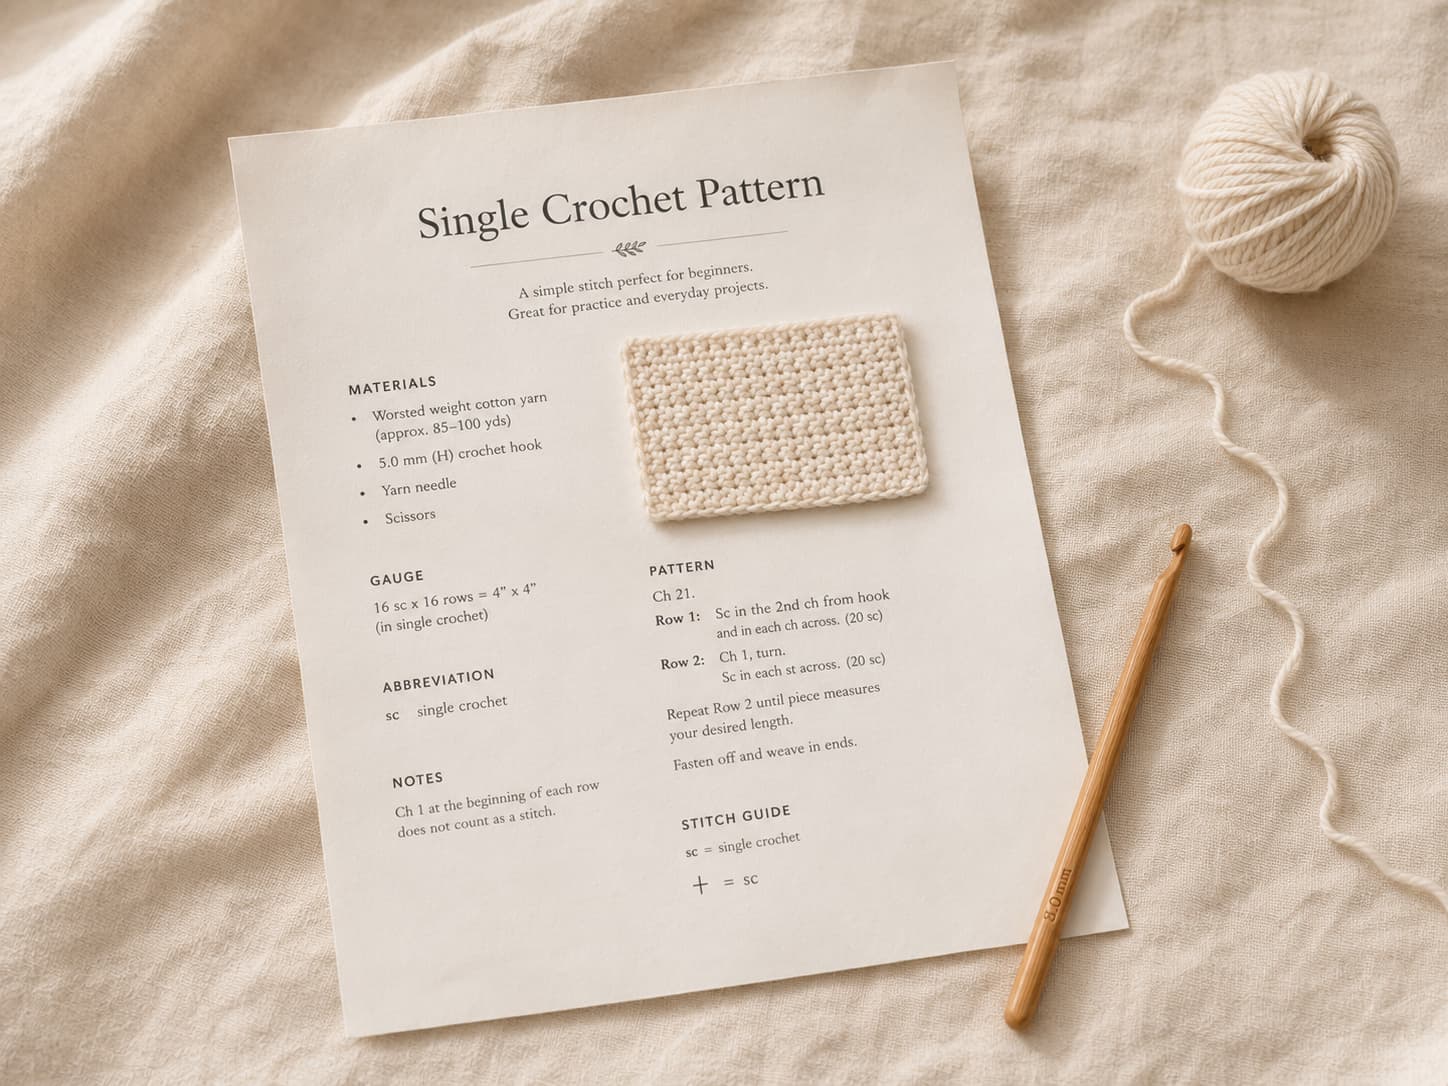
Printed crochet pattern page beside cream yarn and a wooden crochet hook on natural linen in soft morning light.
A printed crochet pattern on a desk—the kind of thing this article will teach you to read with confidence.
Abbreviations covered 12 key terms

The most common abbreviations you will meet in every beginner pattern.

Skill levels explained 4 common levels

Basic, Easy, Intermediate, and Complex, with a note on publisher variations.

Chart symbols 5 core symbols

Chain, sc, dc, tr, and slip stitch — the building blocks of crochet charts.

Real example Knitsoul dishcloth pattern

Every example in this article uses a real row from a published Knitsoul pattern.

Gauge example 14 sc × 15 rows = 10 cm

Learn to read gauge with the actual numbers from the dishcloth pattern.

For all skill levels Reference + tutorial

A companion to keep open while you work through any Knitsoul pattern.
On this page

Section 1

The 12 crochet abbreviations every pattern uses

Crochet abbreviations are the shorthand that keeps patterns short and readable. Instead of writing "single crochet in the next stitch, then single crochet in the stitch after that" a dozen times, a pattern says sc in next 2 sts. The abbreviations are mostly the first letter or two of the stitch name, which makes them easier to remember than they first appear. After a few rows of any pattern, you stop translating and start reading them directly — your brain learns that sc means single crochet the same way it knows that tsp means teaspoon in a recipe.

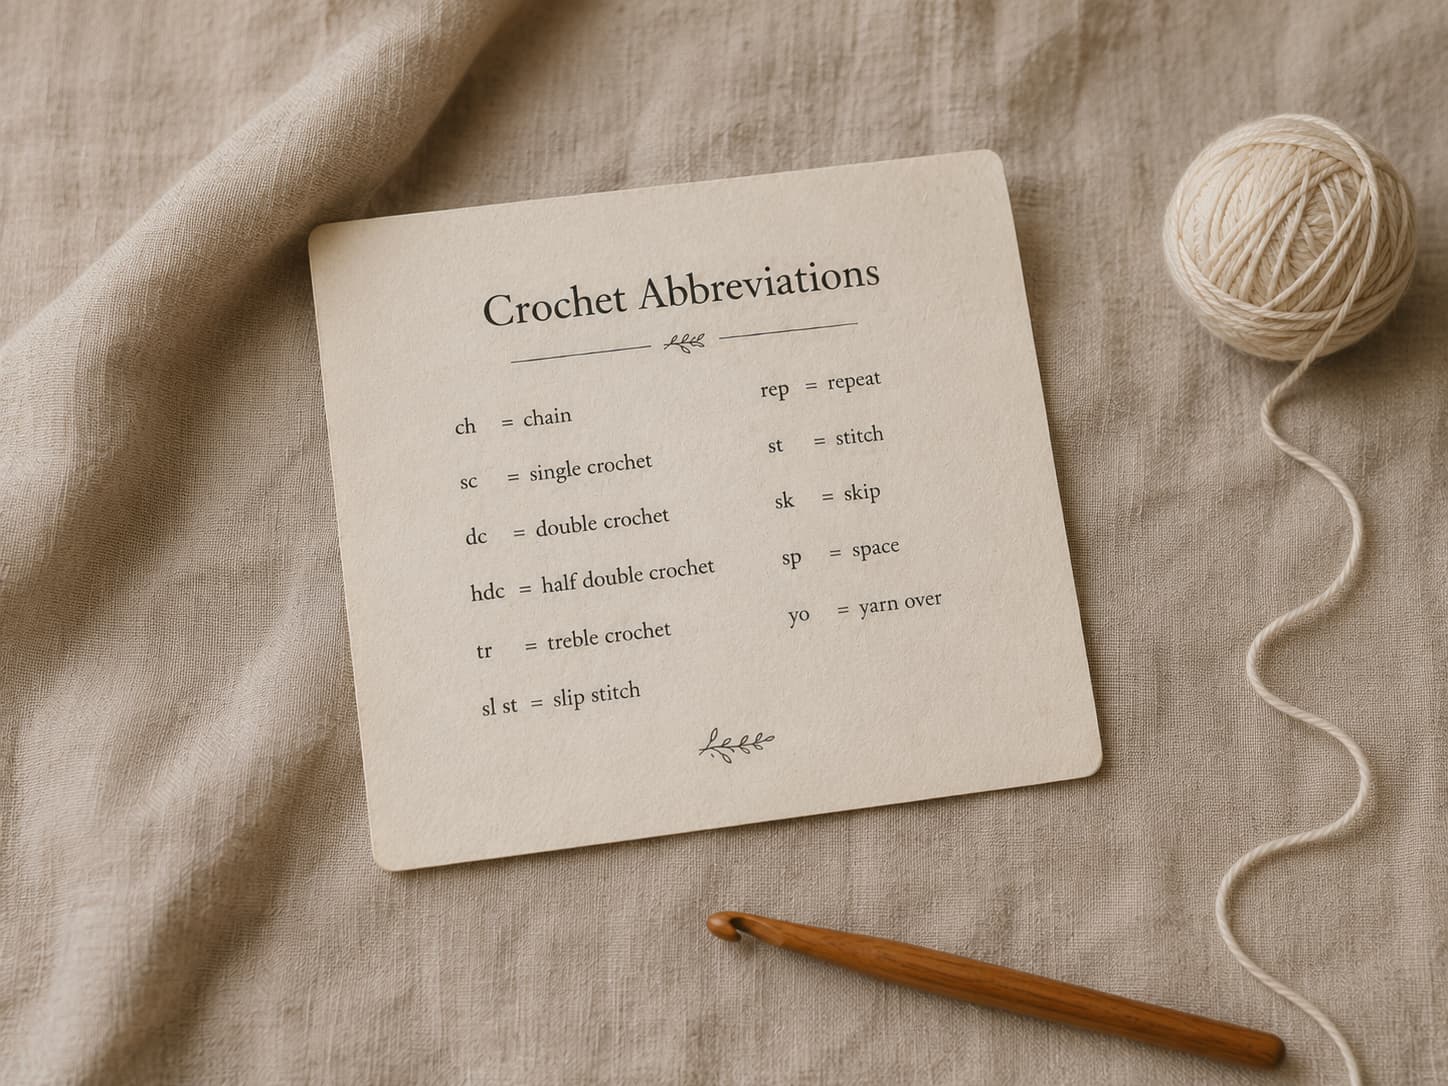
Crochet abbreviations reference card beside cream cotton yarn and a wooden crochet hook on natural linen.
A crochet abbreviations reference card—keep one beside your hook so common pattern terms are always easy to check.

Here are 12 abbreviations and terms commonly encountered in beginner crochet patterns. Individual designers may use additional shorthand, so always read the abbreviation and special-stitch key included with the pattern. For a broader reference, bookmark the crochet and knitting abbreviations glossary.

ch Chain — the foundation of almost every crochet project. You make a chain by yarning over and pulling through the loop on your hook.
sc Single crochet — the shortest basic stitch. Insert hook, yarn over, pull through, yarn over, pull through both loops.
hdc Half double crochet — taller than sc, shorter than dc. Yarn over, insert hook, yarn over, pull through, yarn over, pull through all three loops.
dc Double crochet — one of the most common stitches. Yarn over, insert hook, yarn over, pull through, (yarn over, pull through two loops) twice.
tr Treble crochet — a tall stitch. Yarn over twice, insert hook, yarn over, pull through, (yarn over, pull through two loops) three times.
sl st Slip stitch — insert the hook where directed, yarn over, and pull the yarn through the stitch and the loop already on the hook in one motion. Used for joining, moving across stitches, or finishing an edge.
BLO Back loop only — work the stitch under only the back loop (the strand farther from you). Creates a horizontal ridge on the side facing you.
FLO Front loop only — work the stitch under only the front loop (the strand closer to you). Creates a ridge on the opposite side.
inc Increase — add one or more stitches, commonly by working two stitches into the same stitch. The pattern should define the exact increase used.
dec Decrease — combine two stitches into one. Reduces the stitch count, used for shaping. There are several methods; the pattern will specify which one.
rep Repeat — do the indicated section again. Usually paired with an asterisk or bracket that shows what to repeat.
RS / WS Right side / Wrong side — the two designated faces of the fabric. The pattern notes identify which face is treated as the right side; reversible projects may look suitable from either side.

Section 2

How to read a pattern row, line by line

The best way to learn how a pattern row works is to take a real one apart. Below is Row 2 from the Ridge & Smooth dishcloth — a real Knitsoul pattern that uses single crochet, chain, turning, and back loop only. I have broken it into four pieces so you can see exactly what each part means and what your hands should be doing.

Row 2 — ridge row: Ch 1, turn. Sc in the back loop only of each stitch across. (25 sc)

Ch 1, turn. Chain one, then flip your work around. The chain-1 is a turning chain — it brings your hook up to the height of the next row. Turning means rotating the whole piece so the side that was facing away from you now faces you. The back of the row you just finished is now the front of the row you are about to start.
Sc in the back loop only Single crochet, but only under the far strand of each V. Look at the top of your stitches — each one looks like a little V. Normally you insert your hook under both strands. Here, you insert it under only the strand farther from you. This is what creates the raised ridge on the right side of the dishcloth.
of each stitch across Do this in every stitch until you reach the end of the row. There is no skipping, no increasing, no decreasing — just one single crochet in the back loop of every stitch, one after another, all the way across.
(25 sc) When you finish this row, you should have 25 single crochet stitches. This is the stitch count — your sanity check. Count the V shapes along the top of your row. If you count 24, you missed one. If you count 26, you added one somewhere. Fix it now before you move on to the next row.

That is the whole pattern-reading skill in a single row. Every row in any pattern follows the same structure: a setup instruction, the stitch or stitches to work, where to work them, and a stitch count to confirm you did it right. The moment you can read Row 2 above without hesitation, you can read a pattern.

Section 3

Repeats, brackets, and asterisks: the pattern's shorthand for "do this again"

If a pattern wrote out every single repeat in full, a simple lace border would fill pages. Repeats are how patterns stay compact. Once you learn the three symbols that mark them — the asterisk, the bracket, and the repeat count — you can follow the most efficient instructions in any pattern without losing your place.

The asterisk (*)

An asterisk marks the start of a section you will repeat. The pattern tells you where to start repeating and where to stop. The most common form looks like this:

Example: *sc in next st, 2 sc in next st; repeat from * 4 more times.

Work one single crochet in the next stitch, then two single crochet in the following stitch. The first pass plus four additional repeats makes five repeats total. Each repeat uses two stitches from the previous row and produces three stitches, so the repeated section ends with 15 stitches.

Brackets [ ]

Brackets group a set of instructions together and are often paired with a repeat count. They work the same way as asterisks but are easier to read when the repeated section contains multiple different stitches.

Example: [ch 3, skip 2 sts, dc in next st] 4 times

This means: chain three, skip two stitches, then work one double crochet into the next stitch. Do that entire sequence four times. By the end, you will have made four chain-3 spaces and four double crochet, with two skipped stitches between each.

Nested repeats

Sometimes repeats are nested inside other repeats. A pattern might say something like [sc in next 3 sts, *2 sc in next st, sc in next st* rep from * to * twice] 3 times. When you see nesting, work from the inside out: do the asterisk repeat first, then the bracket repeat. I read nested repeats out loud to myself the first time through — it helps my hands keep pace with my eyes.

Section 4

Understanding stitch counts: the number in parentheses is your friend

At the end of most pattern rows, you will see a number in parentheses: (25 sc), (48 dc), (12 ch-3 sps). That number is the stitch count — it tells you how many stitches you should have when you finish that row. It is not an instruction. It is a verification.

Think of the stitch count as a built-in checkpoint. Every time you finish a row, count the stitches along the top of your work. If your count matches the number in parentheses, you did the row correctly. If it does not match, something went wrong in that row — and you only need to pull back one row to fix it instead of discovering the mistake six rows later.

In the dishcloth pattern, every row ends with (25 sc). That means the cloth is a rectangle — 25 stitches wide from the first row to the last. A pattern where the stitch count changes from row to row (like (25 sc) on one row and (48 dc) on the next) is telling you that shaping is happening — increases or decreases that change the width of the piece. Tracking the stitch count row by row is the single most reliable way to catch mistakes before they compound.

Section 5

Understanding gauge in a pattern: why those little numbers matter

Gauge is how many stitches and rows fit into a standard square of fabric — usually 10 cm by 10 cm (or 4 inches by 4 inches). A pattern states its gauge so you can match it with your own yarn and hook. If your gauge is different from the pattern's, your finished project will be a different size — sometimes dramatically so.

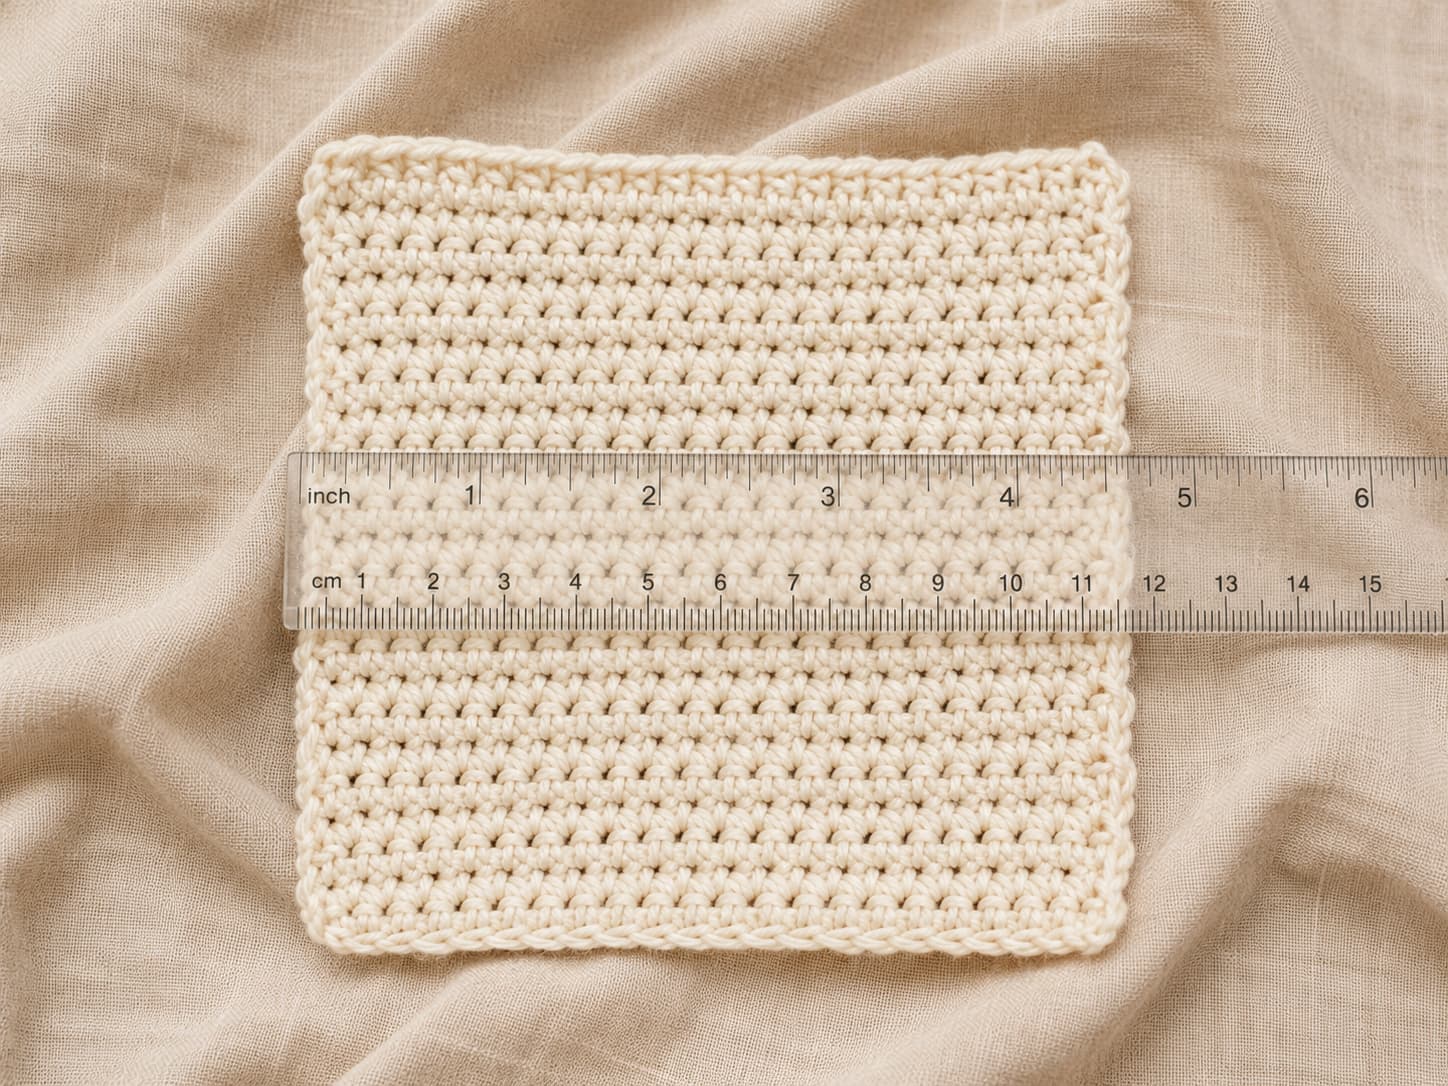
Cream cotton crochet gauge swatch measured across the center with a clear ruler on natural linen.
A cream cotton gauge swatch measured across the center to check stitch count over 10 cm.

Here is how to read gauge in a pattern. The dishcloth pattern states:

Gauge: 14 sc × 15 rows = 10 cm × 10 cm (4 in × 4 in)

This means: using the recommended hook and yarn, 14 single crochet stitches across should measure 10 cm wide, and 15 rows of single crochet should measure 10 cm tall. To check, crochet a swatch that is about 20 stitches wide and 20 rows tall in the stitch pattern, then measure the middle 10 cm — ignore the edges, which can be slightly tighter or looser.

Gauge matters most for garments. If a sweater pattern says 14 sc = 10 cm and your swatch comes out at 12 sc = 10 cm, your stitches are bigger than the pattern expects. Over a sweater front that is 140 stitches wide, your version will be nearly 17 cm larger than intended — a whole size difference. That is why gauge swatches are non-negotiable for clothing.

Gauge is forgiving for dishcloths. For the Ridge & Smooth dishcloth, the gauge is a reference point, not a requirement. Your cloth might come out to 17 cm or 19 cm instead of 18 cm, and it will still wipe a counter perfectly well. If it is much smaller than expected, try a larger hook; if it is loose and floppy, try a smaller one. The goal is a fabric that feels good in your hands, not a perfect measurement.

Section 6

Skill levels explained: what "Beginner" and "Intermediate" actually mean

Many crochet patterns include a project-level label near the materials or pattern notes. These labels are useful guides, but publishers do not all use identical wording. The Craft Yarn Council currently uses Basic, Easy, Intermediate, and Complex; some independent designers use labels such as Beginner, Confident Beginner, or Advanced. Read the required-techniques list as well as the label.

Basic

Uses basic stitches and may include straightforward increases or decreases. Instructions should clearly explain the construction and any unfamiliar technique. Small flat projects are common starting points.

Easy

May include simple stitch patterns, color changes, shaping, working in the round, or basic seaming. The pattern generally assumes you already know the common stitches and abbreviations.

Intermediate

May include involved stitch patterns, more detailed shaping, colorwork, garment construction, post stitches, lace, cables, or several techniques used together.

Complex

May combine complex stitch patterns, shaping, colorwork, construction, and several techniques at the same time. Careful chart reading, consistent gauge, and independent troubleshooting may be expected.

Choose a project whose listed techniques are familiar, with no more than one or two new skills at a time. A clearly written Basic or Easy project is often a better learning step than a higher-level project whose construction is still unfamiliar.

Section 7

Pattern notes and special stitches: read these before you pick up your hook

A well-written pattern normally includes notes before the first row or round. This section explains terminology, construction, turning-chain rules, special stitches, sizing, and anything that differs from standard practice. Read it before making the foundation chain.

Pattern notes typically include:

  • Special stitch definitions. If a pattern uses a stitch that is not one of the standard abbreviations — like a puff stitch, a bobble, or a specific cluster — the notes will define it. For example, the dishcloth pattern's notes explain that sc BLO means single crochet in the back loop only, and that the turning chain does not count as a stitch.
  • Construction notes. How the piece is built — in rows or in the round, from the bottom up or top down, in one piece or in separate pieces that get seamed together. The dishcloth pattern notes tell you it is worked flat in rows with a single-crochet border added at the end.
  • Turning chain rules. Whether the turning chain counts as a stitch. In single crochet, it usually does not. In double crochet, it often does. The pattern notes will tell you, and assuming the wrong answer will throw off your stitch count on every row.
  • Sizing and customization tips. How to adjust the size, what to do if your tension is different, and which measurements are critical versus forgiving. The dishcloth pattern notes explain that sizing is flexible and that a 4.5 mm or 5.5 mm hook can substitute for the recommended 5.0 mm.

Section 8

A brief intro to crochet charts: reading symbols instead of words

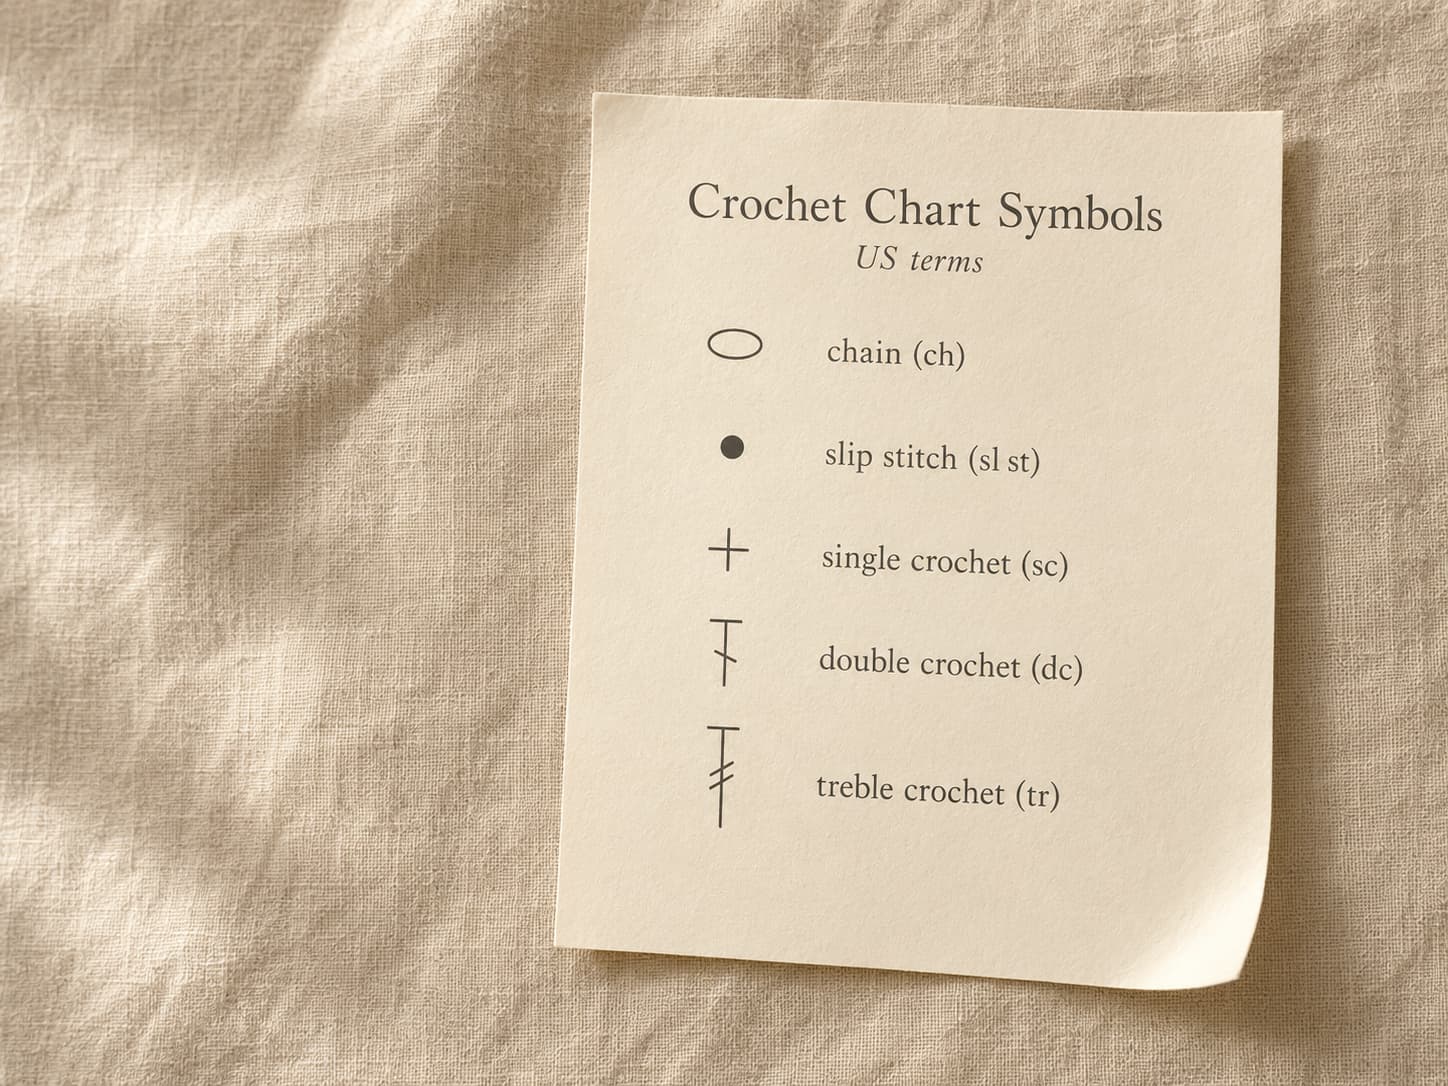
A crochet chart is a visual diagram in which each stitch is represented by a symbol positioned where that stitch is worked. Many core symbols are standardized across publishers, which makes charts useful across languages, but special symbols and drawing conventions can vary. Always read the key supplied with the specific pattern.

Crochet chart showing chain, slip stitch, single crochet, double crochet, and treble crochet symbols on cream paper.
A crochet chart showing how common symbols represent chain, slip stitch, single crochet, double crochet, and treble crochet stitches.

Here are the five most common crochet chart symbols. Learn these five and you can read the majority of beginner and intermediate charts:

Chain (ch) An open oval. Chains may form a foundation, turning chain, or open space.
Slip stitch (sl st) A filled dot in many symbol keys. Check the pattern key because conventions can vary.
Single crochet (sc) A plus sign or cross. It represents one single crochet where the symbol is placed.
Double crochet (dc) A tall stitch symbol with one crossbar, representing the yarn-over used for double crochet.
Treble crochet (tr) A taller stitch symbol with two crossbars, representing the two initial yarn-overs.

How to read a chart: Begin at the start symbol or row number identified by the chart key. Flat charts commonly alternate reading direction because the work is turned after each row. Charts worked in joined or continuous rounds usually follow the arrows or round numbers from the center outward. Left-handed crocheters may use a mirrored chart when one is provided. Do not assume direction from the symbol shapes alone—follow the pattern key, arrows, and row or round numbers.

Troubleshooting

Six common pattern-reading mistakes and how to avoid them

The following errors are common because pattern notation compresses several decisions into a small amount of text. Checking terminology, row ends, repeat boundaries, notes, and stitch counts prevents most of them.

Miscounting the starting chain

The most common beginner mistake happens before the first row. When a pattern says "ch 26," chain exactly 26 — count twice, and remember the loop on the hook does not count. The dishcloth needs 26 chains to produce 25 single crochet because the first sc goes into the second chain from the hook.

Misreading the repeat boundaries

When a pattern says *sc, dc in next*, the asterisks mark exactly what to repeat. Read the words between the asterisks carefully — "next" and "same" are not the same thing, and mixing them up changes your stitch count entirely.

Ignoring the stitch count at the end of the row

The number in parentheses is your checkpoint. Skipping it means a mistake on row 5 might not be discovered until row 22. Count every row at first. Once your hands are reliable, count every few rows.

Working into the turning chain

In single crochet, the turning chain (ch 1) does not count as a stitch and you should not work into it. Beginners often treat it as a stitch, which adds an extra stitch to every row. If your stitch count is consistently one too high, check whether you are working into the turning chain.

Skipping the pattern notes

The notes section tells you whether the turning chain counts as a stitch, defines any special stitches, and explains the construction. Skipping the notes is like starting a recipe without reading the ingredient list — you might get through it, but you will hit surprises that could have been avoided.

Assuming UK and US terms are the same

A US single crochet is a UK double crochet. A US double crochet is a UK treble crochet. The stitches are the same; the names are different. Always check which terminology the pattern uses before you start. Most patterns state it clearly near the abbreviations list. If you see "sc" in the pattern, it is US terminology — UK patterns use "dc" for the same stitch.

Practice tips

Five tips for getting comfortable with pattern reading

Pattern reading becomes easier when the notation is used alongside a real project. These habits reduce lost rows, missed repeats, and uncertainty while the abbreviations become familiar.

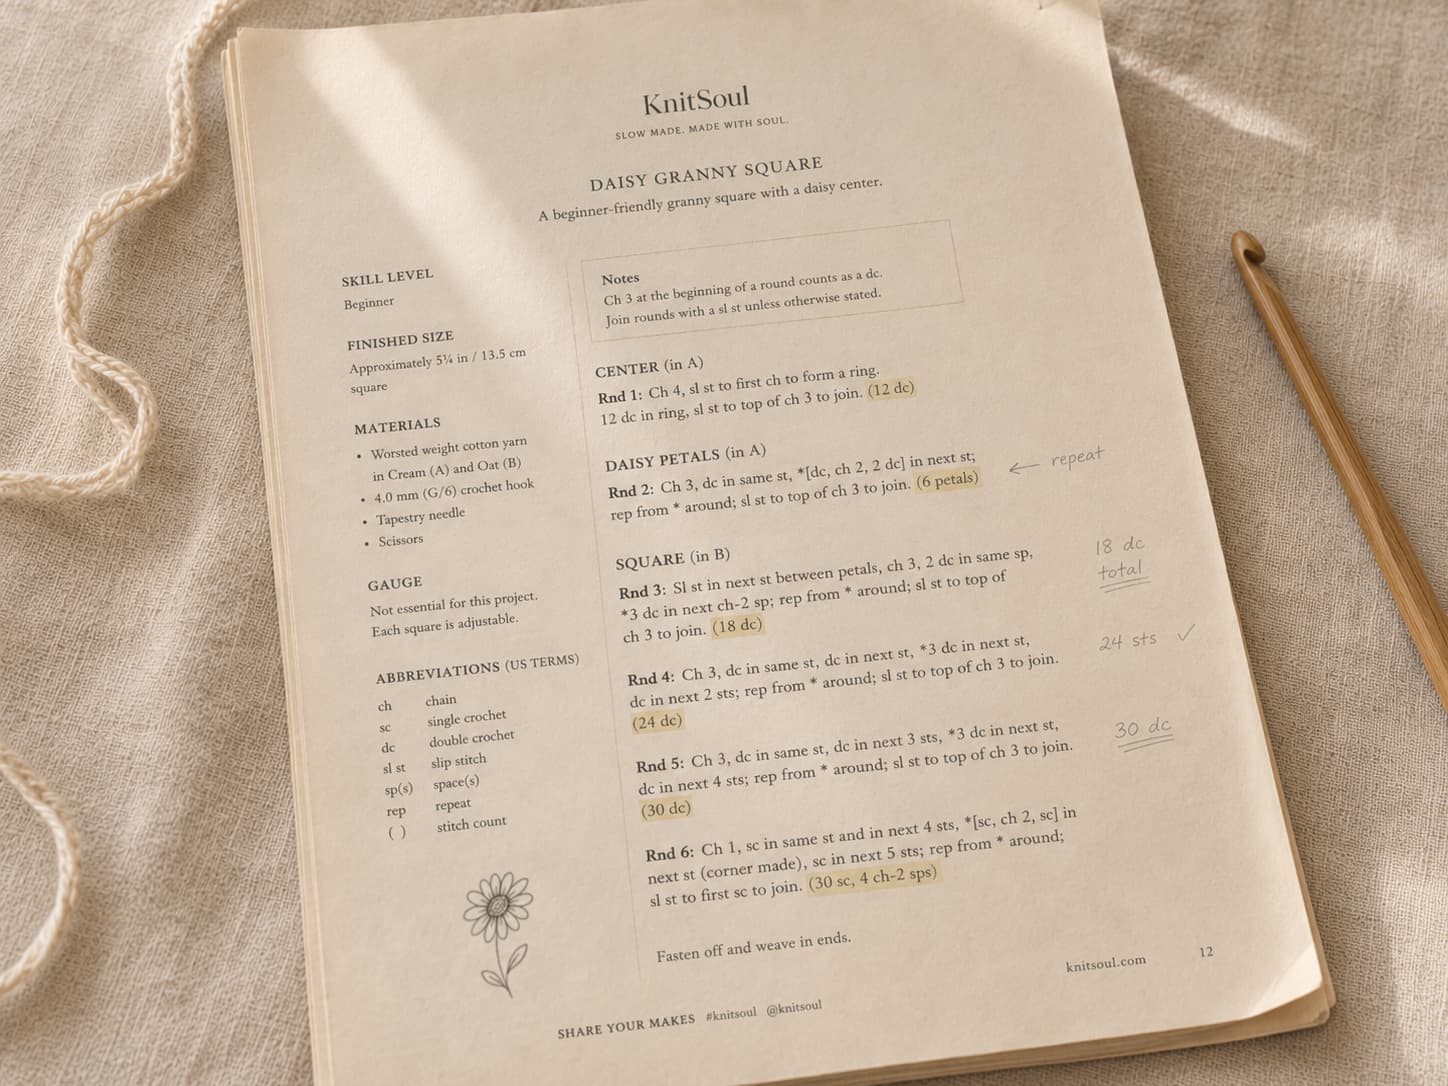
Printed crochet pattern with repeat sections marked, stitch counts highlighted, and handwritten row notes on natural linen.
An annotated crochet pattern with repeat sections, highlighted stitch counts, and handwritten notes for tracking each row.

  • Print the pattern and mark it up. Circle the stitch count at the end of each row. Draw a bracket around repeat sections. Highlight the row you are on. A pattern is a working document, not a museum piece — write on it. I use a highlighter and a pen, and my patterns look thoroughly used by the time I finish. That is the point.
  • Read the entire pattern before you start. Read it once, all the way through, without picking up your hook. You do not need to understand every abbreviation — just get a sense of the structure. How many rows? Is there shaping? Are there special stitches? A five-minute preview prevents surprises.
  • Keep an abbreviations card nearby. Write down the 12 abbreviations from the glossary above on an index card. Keep it in your project bag and glance at it whenever you hesitate. You will stop needing it sooner than you think.
  • Start with a pattern you already know. The Ridge & Smooth dishcloth is a perfect first pattern to read — it uses only chain, single crochet, and slip stitch, with a simple two-row repeat. Because the pattern is short and straightforward, you can focus on learning the notation without also learning complicated stitches.
  • Say the stitches out loud as you work them. "Chain one, turn. Single crochet in the back loop only of each stitch across." Hearing the words while your hands move reinforces the connection between the abbreviation on the page and the action in your fingers. It feels a little silly at first, but it works.

Continue learning

Where to go after learning to read patterns

You now have the core skills needed to approach clearly written beginner patterns: checking terminology, interpreting abbreviations, following repeats, verifying stitch counts, reading notes, and understanding gauge and chart keys.

Not sure which direction to go? The Start Here page lays out a clear learning path through crochet, knitting, patterns, and tools, so you always know what to try next. And if you want to understand why certain yarns work better than others for different projects, the best yarn for beginners guide is a natural companion to this article.

Common questions

How to read crochet patterns FAQ

1.What is the difference between written crochet patterns and crochet chart diagrams?

A written crochet pattern uses text abbreviations and row-by-row instructions — it tells you what to do in words. A crochet chart diagram uses universal symbols (ovals, crosses, T-shapes, dots) arranged on a grid to show you where each stitch goes in relation to the others. Written patterns are more common in English-language publications and are generally easier for beginners. Charts are more common in international patterns, lace designs, and complex stitch work because they show the visual structure of the fabric at a glance. Many experienced crocheters use both — reading the written instructions for the row-by-row details and checking the chart to see how the stitches should line up. If you are just starting, stick with written patterns. Once you are comfortable with the five core symbols (chain, sc, dc, tr, sl st), try a pattern that includes both so you can learn the mapping naturally.

2.Why do crochet patterns use abbreviations instead of writing everything out?

Crochet abbreviations keep patterns short and readable. Writing "single crochet in the next stitch, then single crochet in the stitch after that, then work two single crochet into the following stitch" for every row would turn a one-page pattern into a short novel. The abbreviation sc in next 2 sts, inc conveys the same information in a fraction of the space. Abbreviations also make it easier to scan a pattern quickly — once you know the code, your eye can pick out the structure of a row at a glance. Most crocheters stop translating consciously after a few projects and start reading sc as directly as they read the word "single crochet."

3.How do I know if a pattern uses US or UK crochet terms?

Look first for a terminology statement near the materials, notes, or abbreviation key. The abbreviation sc strongly indicates U.S. terminology because the U.K. system normally calls the same stitch dc. Do not rely only on the designer's country, because patterns may be translated or deliberately written for another market. Confirm the terminology before comparing stitch names.

4.What should I do if I lose my place in a pattern?

First, count your stitches. The stitch count at the end of the current row is your best clue to where you are. If the pattern says (25 sc) and your row has 25 stitches, you are likely on track. If the pattern has a recognizable repeat pattern — like alternating ridge and smooth rows — look at your fabric to see which row you last completed. If you are truly lost, pull back to the last row you are certain of and start from there. It is faster to redo two rows with confidence than to guess and have to fix a mistake six rows later. A row counter — a small clicker or a tally on your printed pattern — prevents this problem entirely.

5.Do I need to learn crochet charts, or can I stick to written patterns?

You can absolutely stick to written patterns. The vast majority of beginner and intermediate patterns published in English include written instructions, and many crocheters go their entire hobby career without reading a chart. That said, learning the five basic chart symbols (chain, sc, dc, tr, sl st) opens up a much wider world of patterns — especially lace designs, international patterns, and Japanese crochet books, which are often entirely chart-based. Charts also give you a visual overview of the stitch pattern that written instructions cannot match. I recommend learning charts when you are ready for them, not before — there is no rush.

6.How long does it take to get comfortable reading crochet patterns?

Most beginners feel comfortable reading simple patterns after completing two or three projects that use written instructions. The first project is the hardest — you will be translating every abbreviation consciously and checking the glossary constantly. By the second project, the common abbreviations (ch, sc, dc, sl st) start to feel automatic. By the third, the structure of a pattern row — setup, stitches, placement, stitch count — becomes so familiar that you can glance at a row and know what to do. The key is to keep going. Pattern reading is a language, and languages are learned through repeated use, not through memorizing a vocabulary list.

You are ready

You can read crochet patterns now

A written crochet pattern is a compact set of directions. Abbreviations name the stitches, repeat markers group actions, placement words tell you where to work, and the final count confirms whether the row is complete.

Before beginning, identify U.S. or U.K. terminology, read the notes and special-stitch definitions, review the construction, and make a gauge swatch when finished size or fit matters. During the project, count regularly and mark completed rows on a printed or digital copy.

The best next step is to use these skills on a short pattern. Open the Ridge & Smooth dishcloth, keep this guide nearby, and work through the instructions one row at a time. The notation will become familiar through use.

Happy crocheting,
— Sophie

Editorial references

Standards used for this guide

The terminology, chart-symbol guidance, and project-level descriptions in this article were checked against the current reference pages below. A specific pattern's own abbreviation list, notes, and symbol key always take priority when they differ.

Free printable + beginner updates

Keep the abbreviations by your hook