How to Crochet a Granny Square: A Beginner's Step-by-Step Guide
Crochet a classic three-round granny square with accurate U.S. terminology, clear cluster counts, color changes, chart guidance, blocking, joining options, and a repeat formula for making the square larger.
Written by Sophie Lane•Published •About 14 minutes to read
EasyU.S. crochet termsThree-round squareApprox. 45–90 min first square
Learn one corner-and-side rhythm that keeps expanding
A classic granny square is crocheted from the center outward in joined rounds. Each corner contains two three-double-crochet clusters separated by a chain-2 space. Every side space contains one three-double-crochet cluster, with a chain-1 between neighboring clusters.
Round 1 creates the four corners. Round 2 places two clusters in each corner and has no separate side clusters yet. Round 3 keeps the same corners and adds one side cluster between each pair of corners. Every later round adds one more side cluster to each side.
The sample uses three colors so the rounds are easy to identify. It starts with an adjustable ring, but a chain-4 loop is included as a simpler alternative. Use smooth #4 yarn and treat a 5 mm hook as the sample size rather than a universal requirement.
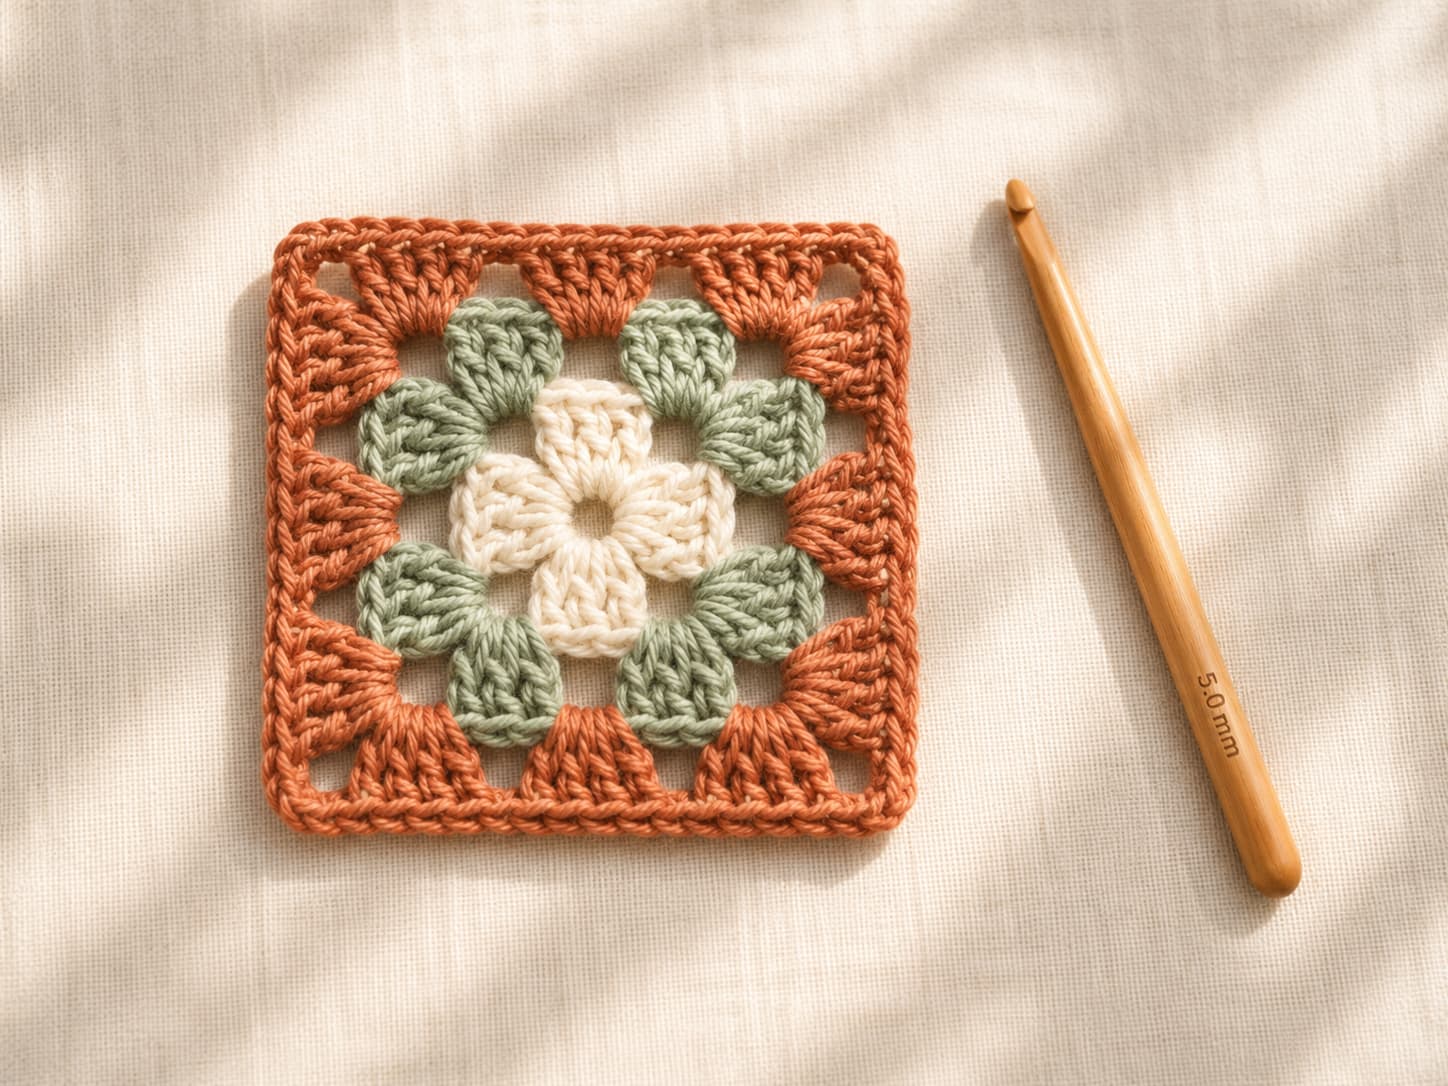
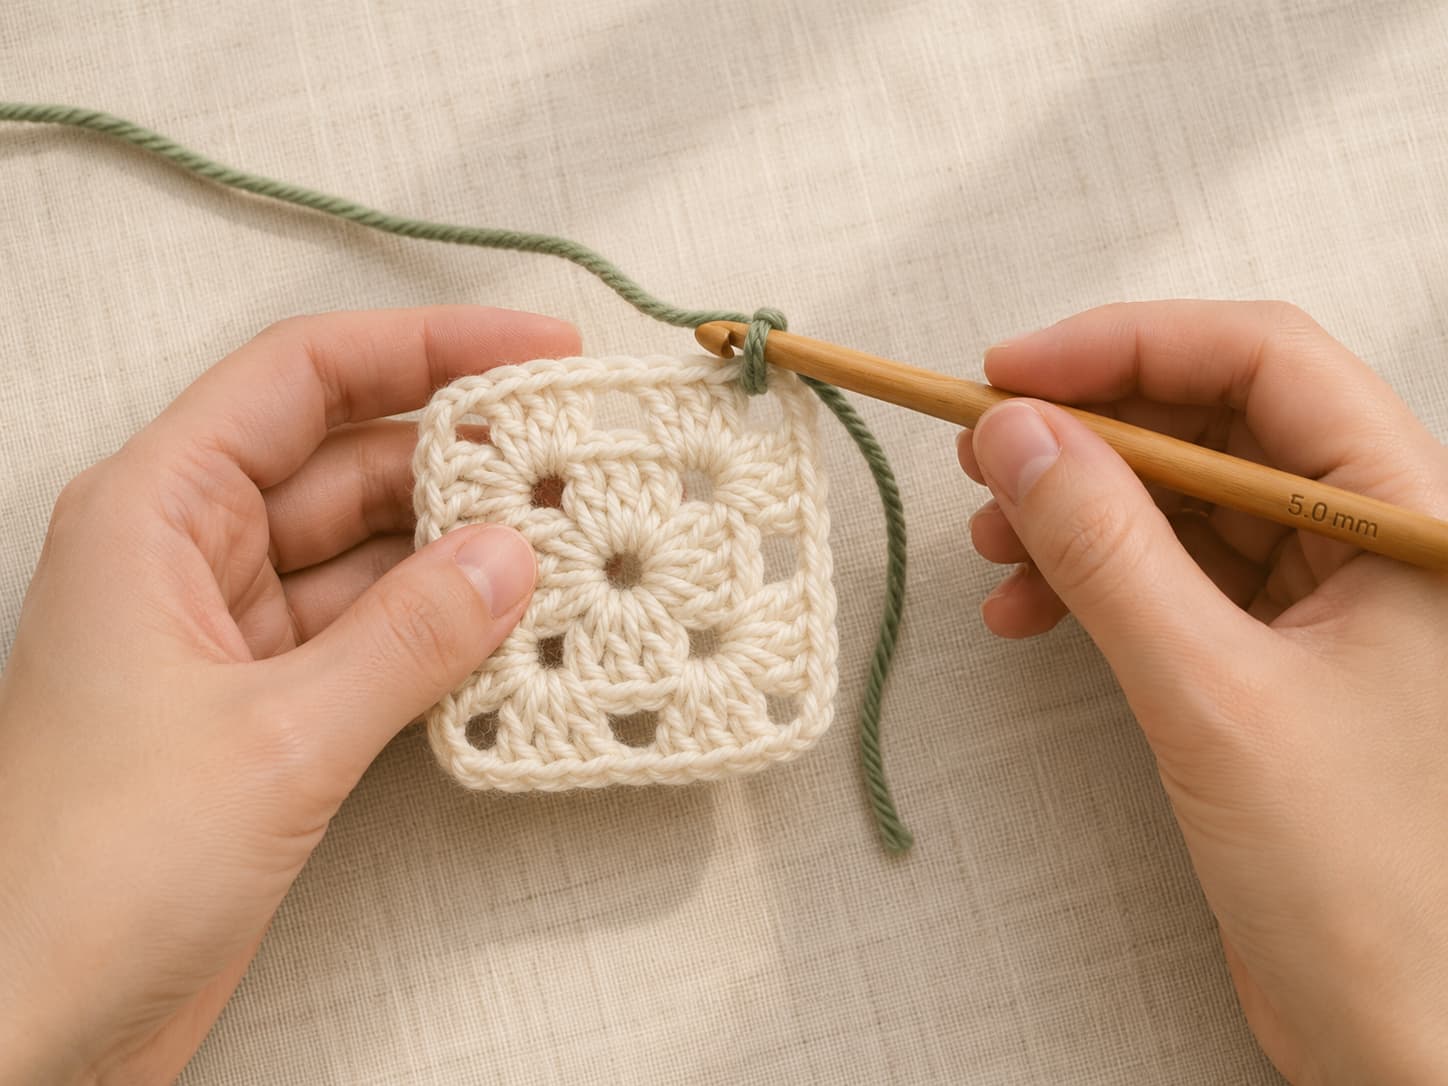
A cream, sage, and terracotta granny square showing the repeating
corner-and-side structure beside a wooden crochet hook.
Skill levelEasy
Uses chain, slip stitch, double crochet, joining yarn, and working in rounds.
Sample hookU.S. H/8 / 5 mm
Adjust after swatching when the fabric feels too tight or too loose.
YarnSmooth #4 yarn
Use three contrasting colors with compatible care instructions.
Finished sizeApprox. 4½–5 in
About 11.5–13 cm after three rounds.
Yarn estimateApprox. 30–45 yd total
Roughly 10–15 yd per color; confirm with the final sample.
First-square timeApprox. 45–90 min
Includes reading, counting, color changes, and corrections.
On this page
Pattern logic
Understand the structure before memorizing the rounds
A granny square is built mostly into spaces rather than the tops of individual stitches. Corners are worked into chain-2 spaces. Side clusters are worked into chain-1 spaces from the previous round.
Round 1
Four clusters total. Every cluster is followed by ch 2, creating four corner spaces.
Round 2
Eight clusters total: two in each corner. There are no separate side clusters yet.
Round 3
Twelve clusters total: eight corner clusters plus one side cluster on each side.
Round 4
Sixteen clusters total: eight corner clusters plus two side clusters on each side.
Round
Total clusters
Side clusters per side
Corner spaces
1
4
0
4 ch-2 spaces
2
8
0
4 ch-2 spaces
3
12
1
4 ch-2 spaces
4
16
2
4 ch-2 spaces
Materials
Use smooth yarn that makes every space easy to see
Three colors help separate the rounds visually, but one color also works. Choose yarns with similar thickness, fiber behavior, and care instructions so the finished square blocks evenly.
Image 02Replace PASTE_IMAGE_URL_02_HERE in the image map
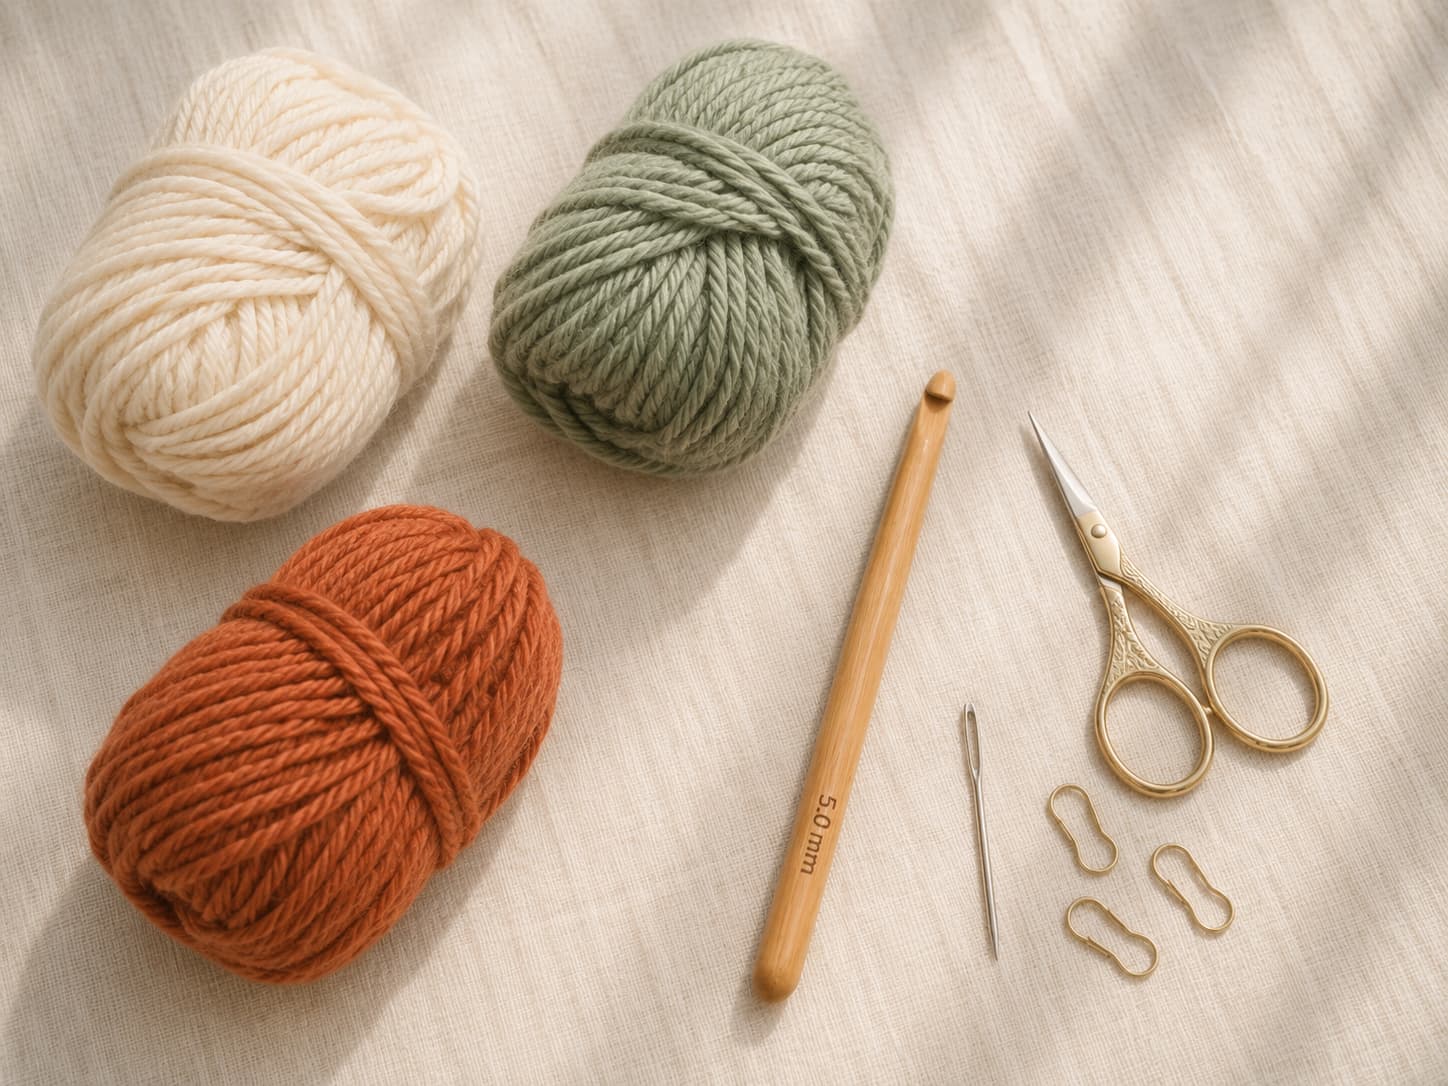
Three small amounts of worsted yarn, a 5 mm crochet hook, and basic
finishing tools are enough to make this sample granny square.
Three colors of smooth #4 yarn
Allow approximately 10–15 yd (9–14 m) per color for the sample. A light center, medium second round, and darker outer round make the construction easy to read.
U.S. H/8 / 5 mm hook
This is the sample hook, not a universal requirement. Follow the yarn label as a starting point and change size when clusters feel crowded or the fabric becomes too loose.
Tapestry needle and scissors
Use a blunt needle to weave every tail through matching-color stitches. Leave at least 6 in (15 cm) at every start and finish.
Four locking markers
Place one in each chain-2 corner space while learning. The markers make the four corners easy to find.
Complete pattern
The Classic Three-Round Granny Square: full written instructions
The square is worked in joined rounds without turning. Fasten off after each round and join the next color in a different corner to distribute the visible joins.
Knitsoul free pattern
Classic Three-Round Granny Square
Skill levelEasy
Finished sizeApprox. 4½–5 in (11.5–13 cm)
YarnApprox. 30–45 yd total #4 yarn
HookSample: U.S. H/8 / 5 mm
ConstructionJoined rounds; fasten off each color
First-square timeApprox. 45–90 minutes
Abbreviations — U.S. terms: ch = chain · dc = double crochet · sl st = slip stitch · sp = space · st(s) = stitch(es) · rnd = round. The beginning ch-3 counts as one dc.
With Color A, make an adjustable ring or ch 4 and sl st to the first ch to form a loop.
Rnd 1: Ch 3, 2 dc in ring, ch 2; [3 dc in ring, ch 2] 3 times. Join with sl st to top of beginning ch-3. Count: 4 clusters, 4 ch-2 corner spaces. Fasten off Color A.
Rnd 2: Join Color B with sl st in any ch-2 corner sp. Ch 3, 2 dc, ch 2, 3 dc in same sp; ch 1. [(3 dc, ch 2, 3 dc) in next corner sp, ch 1] 3 times. Join to top of beginning ch-3. Count: 8 clusters, 4 ch-2 corners, 4 ch-1 side spaces. Fasten off Color B.
Rnd 3: Join Color C in any ch-2 corner sp. Ch 3, 2 dc, ch 2, 3 dc in same sp; ch 1, 3 dc in next ch-1 sp, ch 1. *Work (3 dc, ch 2, 3 dc) in next corner sp, ch 1, 3 dc in next ch-1 sp, ch 1; repeat from * around. Join to top of beginning ch-3. Count: 12 clusters, 4 ch-2 corners, 8 ch-1 side spaces. Fasten off Color C.
Pull the adjustable-ring tail only after checking all four corners. Weave every tail securely on the reverse face.
Block according to the yarn label, shaping four sides and four corners without stretching the center open.
Step-by-step
Build the square from four counted corners
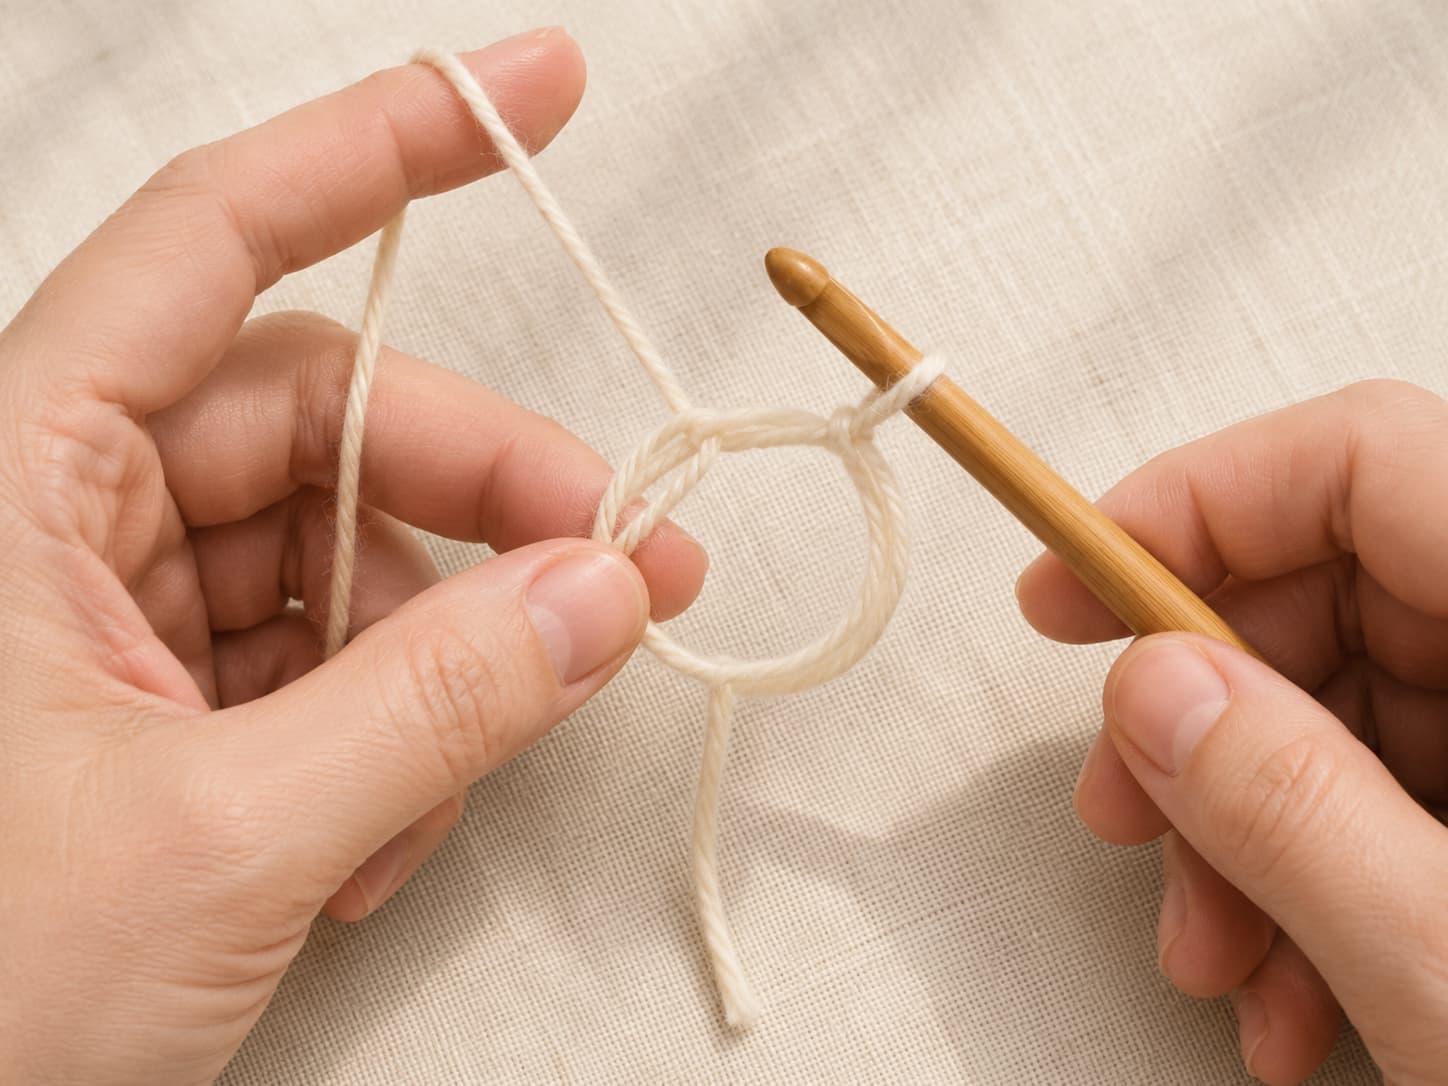
The adjustable magic ring creates a neat center that can be tightened
before the yarn tail is woven in securely.
Start the center
For an adjustable ring, work Round 1 around both the loop and the tail. After joining, pull the tail to close the center and later weave it in more than one direction. For a chain-loop start, ch 4 and join to the first chain.
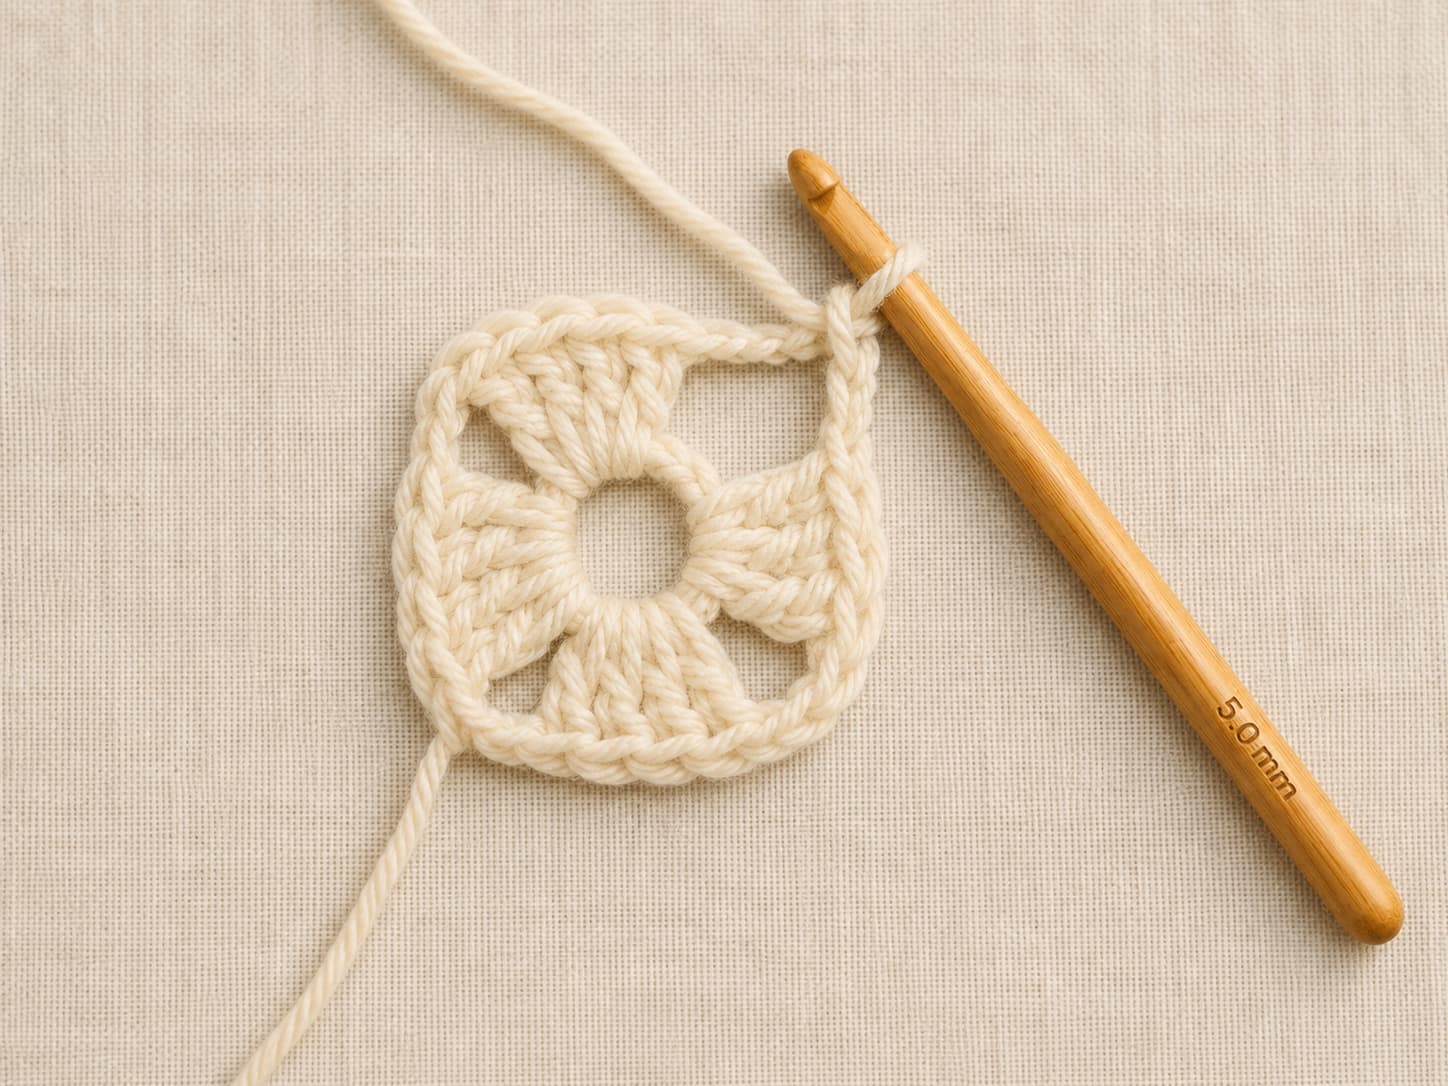
Three double-crochet clusters are complete, with the fourth corner space
left open for the final cluster of Round 1.
Round 1: make four clusters and four corners
1
Ch 3, then work 2 dc. The beginning chain and two double crochets form the first 3-dc cluster.
2
Ch 2 for the corner. Mark the space when it is difficult to see.
3
Work 3 dc, ch 2 three more times. Count four clusters and four corner spaces before joining.
4
Join to the top of the beginning ch-3. Do not join into the first visible double crochet beside it.
Join each new color in a corner space and leave enough tail for secure weaving.
Round 2: place two clusters in every corner
Corner(3 dc, ch 2, 3 dc) in ch-2 corner sp
Betweench 1
Count4 corners × 2 clusters = 8 clusters
Round 3: add one cluster to each side
Corner(3 dc, ch 2, 3 dc) in corner sp
Sidech 1, 3 dc in side ch-1 sp, ch 1
Count8 corner clusters + 4 side clusters = 12
For later rounds, keep the corners unchanged, work 3 dc in every side ch-1 space, and ch 1 between neighboring clusters. Each new round adds one side cluster per side.
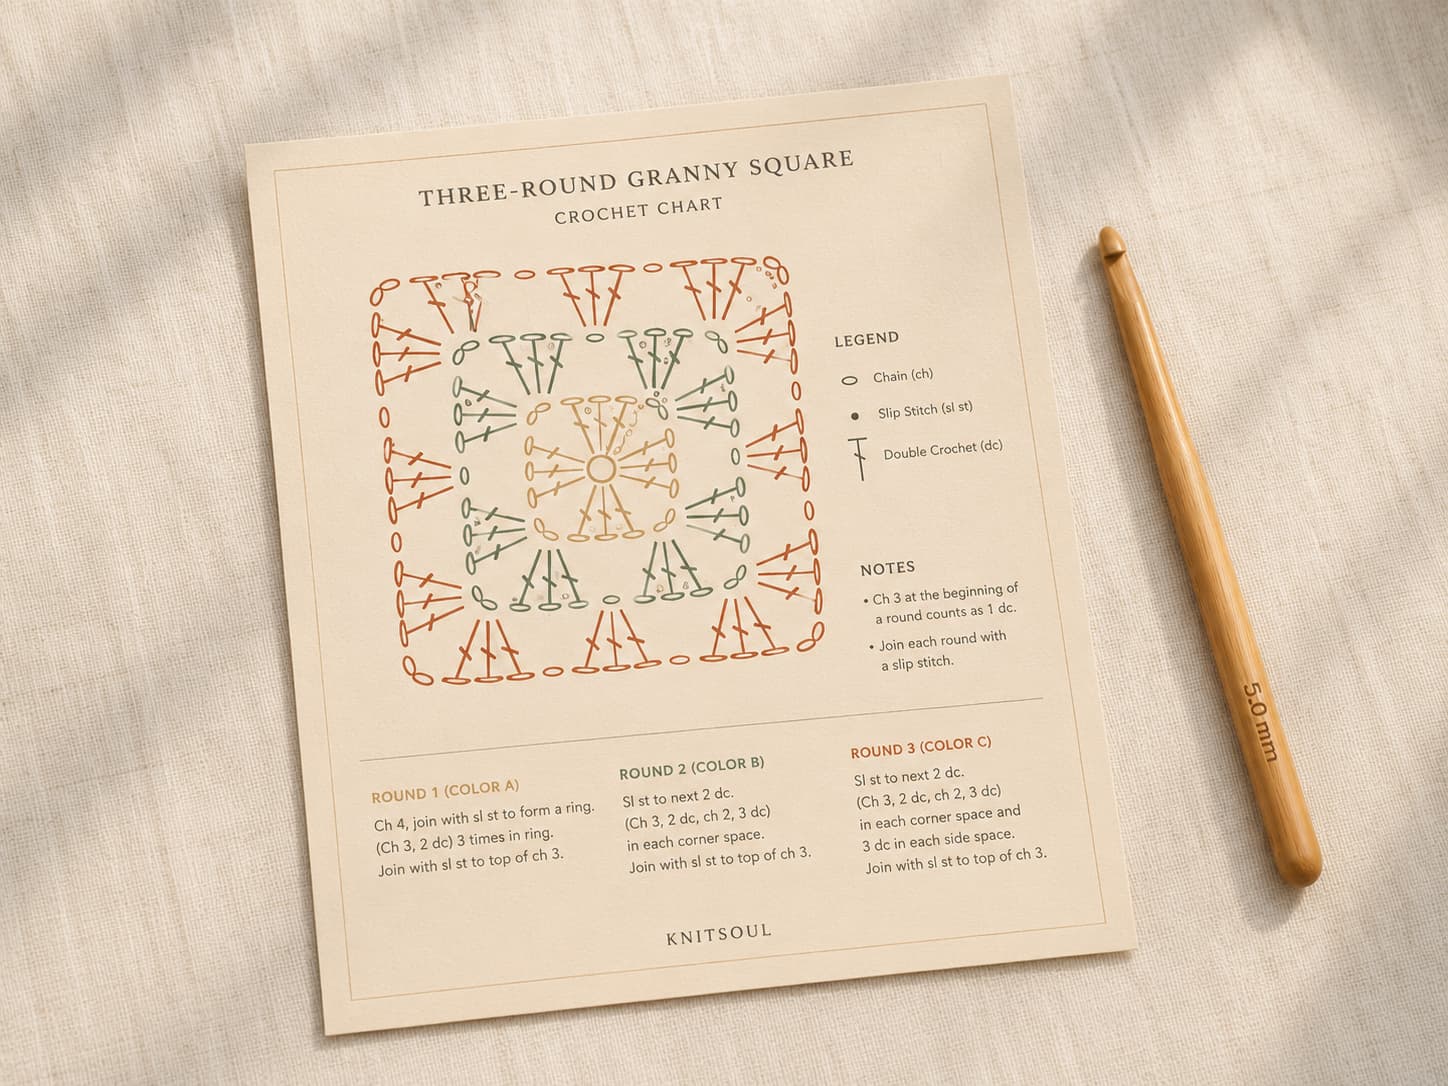
Crochet symbols
Read the chart from the center and check the pattern key
A chart shows where stitches are placed. In a standard chart, every double crochet normally receives its own symbol. Do not assume one T-shaped symbol represents an entire cluster unless the chart key explicitly says so.
Consistent blocked granny squares are easier to arrange and join into
larger projects.
Chain: open oval.
Slip stitch: filled dot.
Double crochet: vertical line with one crossbar.
A right-handed chart is generally followed counterclockwise from the center outward; a left-handed crocheter may mirror the direction. The chart and written counts should agree: 4 clusters in Round 1, 8 in Round 2, and 12 in Round 3.
Joining
Choose a seam based on the front and back appearance
Block every square to the same measurements before joining. Match corners first, then distribute edge stitches evenly.
Whip stitch
Sew matching edge loops with a tapestry needle. This seam is flexible and easy to undo.
Slip-stitch seam
Place right sides together and slip stitch through matching edge loops. When opened, the ridge remains mainly on the reverse face.
Single-crochet join
Hold wrong sides together and single crochet through matching loops. The raised seam remains visible on the front.
Join as you go
Connect a square during its final round. This reduces later seaming but is better learned after a separate join feels comfortable.
Project planning
Calculate square counts from the blocked measurement
Divide the target width and height by the blocked square size, then round each result up. Joining and borders affect the final measurement, so join a small test group before calculating a large blanket.
Nine squares
A 3 × 3 layout can form a cushion front when the blocked size matches the insert.
Forty-nine 5-inch squares
A 7 × 7 layout measures about 35 inches before seam and border effects.
One growing square
Continue adding rounds to make a blanket without separate motifs or joining seams.
Small project first
Join four squares before committing to dozens so you can test size, seam, and color order.
Customize it
Change one feature while keeping the structure consistent
One-color square
Continue with one yarn and join each round. Move the starting point or use a standing stitch later when you want a less visible seam.
Turned rounds
Alternating direction can reduce directional twisting in larger squares. Turning changes the texture, so use the method consistently from the beginning.
Giant granny square
Continue the standard corner-and-side repeat until the piece reaches the planned blanket size.
Separate solid pattern
A denser solid granny square uses different stitch placement. Treat it as a separate tested pattern instead of removing chains from only part of this version.
Color inspiration
Three color combinations to get you started
Cream, Sage & Terracotta
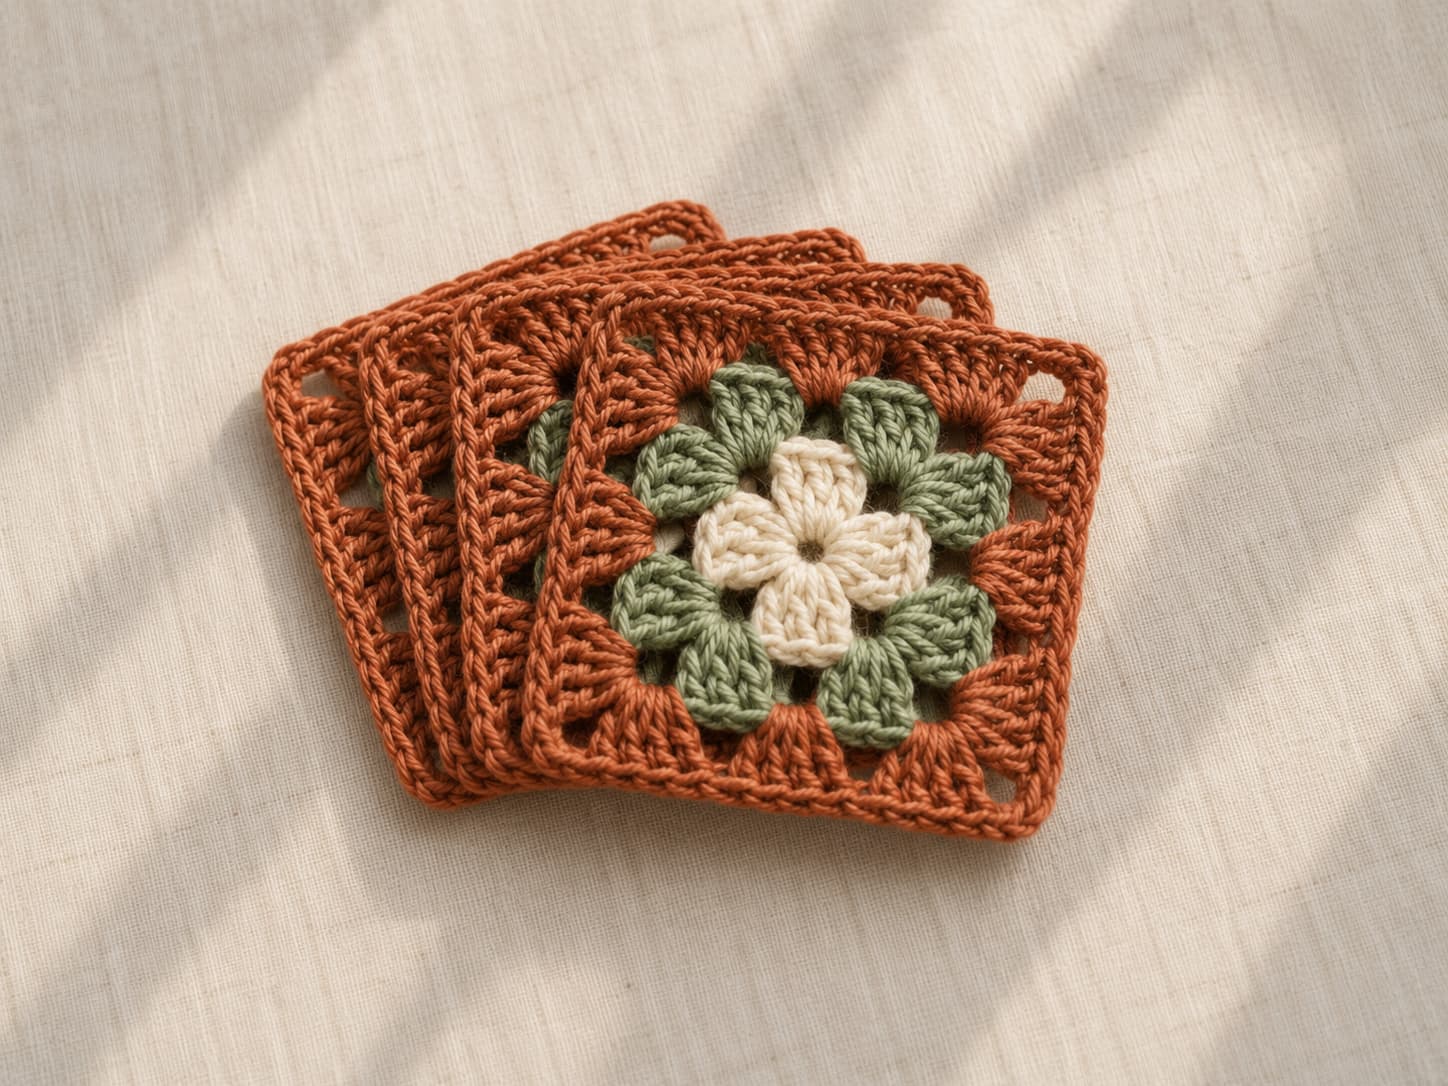
The squares in the photos. Warm, natural, and earthy. A cream center, sage middle round, and terracotta outer round.
Cream, Honey & Olive
Soft and vintage-inspired. A warm honey middle round framed by a deep olive outer round. Feels like a 1970s heirloom.
Oatmeal, Dusty Blue & Charcoal
Cool and modern. A neutral oatmeal center, soft dusty blue middle, and dark charcoal border. Works for any room.
Troubleshooting
Six mistakes to correct before the next round repeats them
Only three corners remain
Count four chain-2 spaces before joining every round. Undo to the skipped corner and rework it.
Round 2 has side clusters
Round 2 places two clusters only in each corner. Its chain-1 spaces are created for Round 3.
The square cups upward
Check for a missed space, tight chains, or a hook that is too small before changing the corner formula.
The square ripples
Look for an extra cluster, extra corner, or very loose chains. A larger hook will not fix an incorrect count.
The joins stack diagonally
Joining every new color in the same corner creates a visible line. Rotate the starting corner.
The center reopens
Weave the adjustable-ring tail through matching stitches, reverse direction, and leave enough length before trimming.
Practice tips
Make the first five squares a controlled practice set
Mark every corner. Move four locking markers into the newest chain-2 spaces.
Count clusters before joining. The first three rounds contain 4, 8, and 12 clusters.
Use the same hook and yarn family. Consistency makes tension differences easier to identify.
Measure after blocking. Use the blocked square for project calculations.
Weave ends in small batches. Do not leave dozens of unsecured center and color-change tails until the end.
Continue learning
Turn one accurate square into a repeatable project system
Consistent blocked squares are easier to arrange and join into larger
projects.
Make three more squares with the same yarn and hook. Block them together, compare the measurements, and practise one joining method before starting a blanket or garment.
1.How long does a first three-round granny square take?
A complete beginner should plan for approximately 45–90 minutes, including reading, counting, joining colors, correcting mistakes, and weaving ends. After the structure becomes familiar, a similar square may take about 20–30 minutes.
2.How many clusters should each round contain?
Round 1 has 4 three-double-crochet clusters, Round 2 has 8, and Round 3 has 12. Beginning with Round 2, Round n contains 4n clusters total. Every round retains four chain-2 corner spaces.
3.Can I start without a magic ring?
Yes. Chain 4 and join with a slip stitch to the first chain, then work all Round 1 stitches into the center loop. This leaves a small, stable opening.
4.Why is my granny square curling or rippling?
First confirm four corners and the correct cluster count. Cupping may come from missing spaces, tight chains, or a hook that is too small. Rippling often indicates an extra cluster, extra corner, or loose chains.
5.How do I make the square larger?
Work (3 dc, ch 2, 3 dc) in every corner space. Work 3 dc in every side chain-1 space and chain 1 between neighboring clusters. Each new round adds one side cluster per side.
6.How many squares do I need for a blanket?
Measure one blocked square, divide the target width and height by that measurement, and round each result up. Multiply the column and row counts. A 7 by 7 layout of 5-inch squares measures about 35 inches before seams and a border.
7.What is the difference between U.S. and U.K. terms?
U.S. double crochet is U.K. treble crochet. The stitch structure is unchanged, but names and abbreviations differ. Confirm the terminology note and chart key before beginning.
You are ready
Count four corners and let the square grow one round at a time
The complete logic is compact: two clusters in every corner, one cluster in every side space, chain 2 inside corners, and chain 1 between clusters. When those landmarks remain correct, the square grows predictably.
Make the first square slowly, weave its ends, block it, and measure it. Then repeat the same yarn, hook, and method until the size becomes consistent.
Happy crocheting, — Sophie
Editorial references
Standards checked for this tutorial
Yarn-weight wording, crochet abbreviations, chart symbols, pattern-reading conventions, and project-level language were checked against the Craft Yarn Council reference pages. The final yarn label and tested sample take priority for hook size, care, yardage, and finished dimensions.